Keep up with the updates:
AdventureDoor • Walkthroughs • Secret Files: Tunguska
Secret Files: Tunguska
walkthrough
About this walkthrough
This is a complete walkthrough for Secret Files: Tunguska.
Using this walkthrough will get you through the game with the least amount of time and wandering around, but may spoil the game and fun of exploring.
AdventureDoor walkthroughs use terms and phrases which try to match in-game texts as closely as possible. In some cases this means that walkthroughs have grammatical and typographical errors (such as "open door" instead of "open the door"), but it makes following the walkthrough easier while playing the game.
Items which can be picked up as new inventory items and items which can be constructed by combining or using other items are written with bold text for emphasis.
Berlin
- Use the telephone to call the police.
- Leave the room and try to enter the office where the music is coming from.
- Look at the nameplate on the wall, it says Max Gruber.
- Go to the other side of the hall and try to open the fuse box.
- Go to the hall that leads to downstairs.
- Study the list on the wall that is next to the brochure stand to learn where Max Gruber's office is.
- Walk to the area that is between Tyrannosaurus Rex and Triceratops.
- Examine the statue on which T-Rex is standing and where the rope around it has been cut to find a secret door.
- Open the door and talk to Eddy, after which he leaves.
- Pick up the key that Eddy must have lost there.
- Go back upstairs.
- Use the key to unlock the fuse box.
- After Max Gruber opens the door, talk to him about everything.
- Go back to Daddy's office and talk to Detective Kanski, who is there now, about everything.
- After the conversation you will end up outside.
- Ride the motorcycle to go to Vladimir's house.
- After the cutscene, try to use the computer on the desk.
- Move the carpet on the floor to find a gap under it.
- Try to reach whatever is hidden there.
- Pick up the book that is in the drawer in front of the fish tank.
- Read the book in the inventory to learn that it is a book casket.
- Look at the fish tank to see a key in there.
- Try to pick up the key.
- Use the door to go outside.
- Use the key ring on the motorcycle seat to unlock it.
- Open the motorcycle seat to find a cell phone and sunglasses.
- Use the motorcycle to ride to the museum.
- Talk to the girl, Lisa, who is sleeping on the bench about everything.
- Try to fix the bike and you will get a flat tube.
- Use the motorcycle to ride to Vladimir's house.
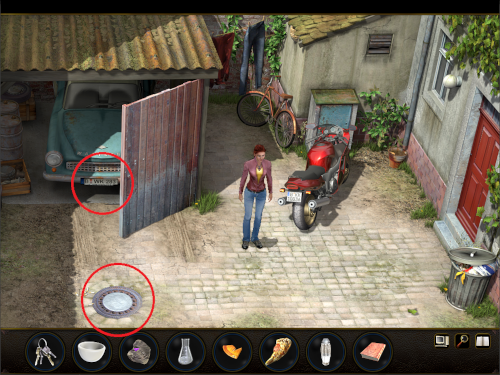
- Interact with the cycle that is leaning against the wall to find an air pump.
- Use the airpump with the flat tube. It becomes a tube in the inventory, but it still needs fixing.
- Try to pick up the bucket under the rain pipe and the handle comes off.
- Use the tube with the bucket on the ground to find a leaking spot.
- Search the garbage bin to find a rubber glove and a spoke.
- Search the crate in the garage to find double-sided tape and glue.
- Use glue with the rubber glove to get a sticky rubber glove.
- Use the sticky rubber glove with the tube to get a patched tube.
- Use the motorcycle to ride to the museum.
- Use the patched tube with the bike.
- Talk to the girl about everything, and she will give you her camera.
- Use the motorcycle to ride to Vladimir's house.
- Enter the house.
- Take the portable cassette player from the floor.
- Examine the portable cassette player to find batteries.
- Use batteries with the camera.
- Go outside and use the motorcycle to ride to the museum.
- Give the camera to the girl, and you will get a magnet in return.
- The girl leaves, and there's nothing to do in the museum area for now. If you like, take a look at the surroundings, like the statues near the entrance.
- Use the motorcycle to ride to Vladimir's house.
- Enter the house.
- Use the spoke with the gap to find a cassette.
- Go to the desk and use the cassette with the cassette tape recorder.
- Play the tape to hear the message: "The first and last on the car, a fourth of the openings to the underworld, and finally, the guardians of my work." The goal now is obviously to interpret that cryptic message.
- If you can't figure it out, one part of the message refers to a licence plate, one part refers to a sewer entrance, and one part refers to statues at the museum (aren't you glad now if you actually looked at them earlier?).
- If you still can't figure it out, the licence plate is "B WK 283", there are 16 holes in the sewer grate, and there are two statues near the museum entrance.
- If you *STILL* can't figure it out, it's 2 and 3 from the licence plate, 16/4=4 from the sewer grate, and 2 from the museum entrance, which gives a series of numbers: "2342". And this is a password for something.
- Use the computer and enter the password "2342". (Nina, and you, probably could have just used brute force to break it. It's only four digits anyway...)
- Look at the monitor to snoop around the email messages.
- Take the pizza from the desk.
- Take the salt shaker from the desk.
- Use the magnet on the fish tank to get a key.
- Use the key on the book casket to find Vladimir's address book and a note.
- Read the note.
- Read Vladimir's address book to find Oleg Kambursky's address.
- Go outside and use the motorcycle to ride to Oleg's house.
- Go to the door and ring the doorbell.
- Use the path on the left side to go to the backyard.
- Look through the window slit.
- Take the broomstick that is leaning against the wall.
- Go back to the street.
- Go to the door again, now there's a cat waiting to be fed.
- Put the pizza in the feeding dish.
- Use double-sided tape with the cell phone.
- Use the cell phone with the cat.
- Use the salt shaker with the pizza to get the cat go inside. You will end in the backyard to see the cat go back inside.
- Go back to the street.
- Use the telephone booth to call the cell phone. It works, but the scared cat runs to a tree.
- Pick up the plastic bag from the ground.
- Use the handle with the plastic bag to create a reinforced plastic bag.
- Use the broomstick with the reinforced plastic bag to make a brailer.
- Use the brailer with the cell phone on the tree to get the cell phone back.
- After hearing the recording, use the motorcycle to ride to the museum.
- Watch the cutscene.
- After the cutscene, go inside, go upstairs, and enter Max Gruber's office. Talk to him about everything. If you talk about the note, Max will give you a diadem.
- Examine the diadem.
- Look at the totem pole.
- Use the spoke with the totem to get a red glass bead.
- Open the refrigerator to find an acid bottle and a cement bag.
- Examine the cement bag.
- Go to Daddy's office.
- Examine the piece of rock on the table.
- Pick up the piece of rock.
- Take the porcelain bowl from the table.
- Use the porcelain bowl with the radiator vent to get a porcelain bowl with water.
- Use the cement bag with the porcelain bowl with water to get a porcelain bowl with water and cement.
- Take the flask that is on top of the machine right next to the door.
- Leave the room.
- Examine the plant in the hall.
- Take a piece of plant.
- Use the piece of plant with the porcelain bowl with water and cement to get putty in porcelain bowl.
- Go to the hall that leads to downstairs.
- Go outside.
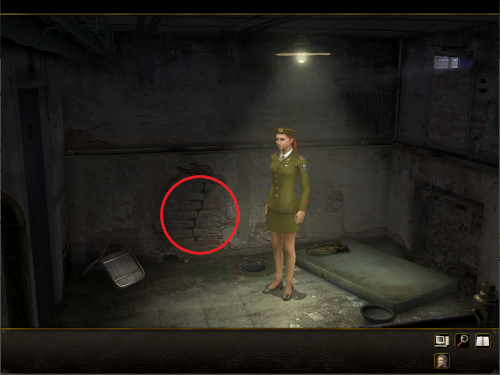
- Pick up a yellow shard from the ground near the construction site.
- Go back inside.
- Use the diadem with putty in porcelain bowl.
- Use the red glass bead with the diadem.
- Use the acid bottle with the flash to get a flask with acid.
- Put the piece of rock into the flask with acid to get an amethyst.
- Use the amethyst with the diadem.
- Combine sunglasses with the yellow shard to get a green shard.
- Use the green shard with the diadem.
- Use the diadem on the lamp that is near Triceratops.
- Examine the plan on the wall that the beams of light hit.
- After doing that, Max comes back. Talk to him about everything.
- After the conversation you will automatically go to Max's office. Examine the relief disk on the wall.
- Take the coin that is hidden in the relief disk. It may require some pixel hunting, but it's in the straight line below the face.
- Go to Daddy's office.
- Examine the coin showcase near the window.
- Put the coin in the empty compartment.
- Read the note that is next to the coins to learn what must be done.
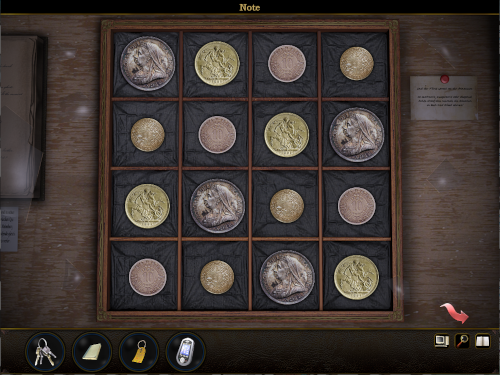
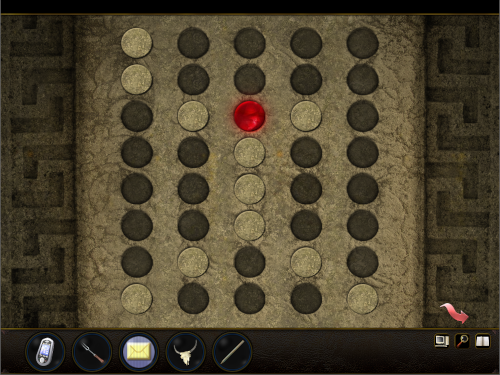
- Rearrange the coins according to what the note said.
- If you can't figure it out, the easiest way is to first arrange coins on the first row from the largest to smallest. Then on the second row arrange them from the smallest to largest. Then on the remaining two rows arrange coins so that no similar coins are in any vertical, horizontal, or diagonal lines.
- If you still can't figure it out, here's the picture of the right solution. There are many ways to solve this, but the principle remains the same.
- Watch all the cutscenes and conversations that follow.
Moscow
- Search through the rubble behind the car to find a nut and an unidentifiable thing.
- Try to take the rusty car jack that is under the car.
- Talk to the sewer worker about everything.
- After the conversation look at his bag to get a bread box.
- Examine the bread box to find bread and butter and a rubber band.
- Pick up bricks that are behind the sewer worker.
- Use bricks with the car.
- Use bread and butter with the rusty car jack to make it operational again.
- Take the car jack.
- Go to the side entrance to station.
- Examine the newspaper that Sergeant Yushin is reading.
- Talk to Sergeant Yushin about everything.
- Examine the cigarette butts on the ground.
- Talk to Sergeant Yushin about cigarettes, and he will give you a cigarette.
- Pick up a pebble from the ground.
- Use the unidentifiable thing with the rubber band to make a slingshot.
- Use the pebble with the slingshot to get a loaded slingshot.
- Use the loaded slingshot with the lamp that is above Sergeant Yushin.
- Pick up the newspaper.
- Take the pencil that is on the wall near the gate. If you picked a pencil earlier in Vladimir's house, you don't need this one.
- Use the pencil with the newspaper.
- Exit the area and go back to the sewer entrance.
- Give the newspaper to the sewer worker.
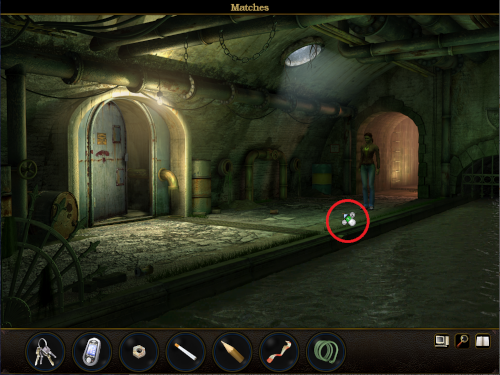
- Enter the sewer canal.
- Pick up matches from the ground. This may require some pixel hunting.
- Try to open the door.
- Use the car jack with the door to open it.
- Examine the ladder (ascent), which is broken.
- Go back to the street.
- Pick up the barrier, which becomes iron bars and barrier tape in the inventory.
- Go back to the sewer canal.
- Try to use iron bars with the broken ladder.
- Go back to the street and then to the side entrance to station.
- Give iron bars to Sergeant Yushin and he will show off his muscles and bend them as bent iron bars.
- Exit the area and go back to the sewer entrance.
- Go back to the sewer canal.
- Use bent iron bars with the ladder (ascent).
- Climb up the ladder.
- Look through the opening under the toilet doors.
- Talk to the legs that stick out about everything.
- After the conversation, go to the passage on the left and eavesdrop on another conversation.
- Use matches with the cigarette.
- Place the cigarette in the dish on the bench.
- Try to open the locker on the left. It has a five-digit combination lock, and Nina is not going to brute force it. (So she really could have used brute force with the four-digit password earlier!)
- Open the locker on the right. Examine it in detail.
- Take the uniform, Nina will automatically wear it.
- Take the stocking.
- Take the radio. Examine the radio.
- Take the envelope. Examine it to learn more about the situation.
- Go through the door and enter a warehouse.
- Try to talk to men in black to learn more, but they don't talk.
- Go through the passage to the platform.
- Talk to the soldier about everything. Pay attention to the conversation.
- Go back to the gate where Sergeant Yushin is; into the warehouse, then the toilet, then the sewer canal, (Nina will automatically change clothes here) up to the street, and finally around the corner.
- Talk to Sergeant Yushin about FSB agents.
- Exit the area and go back to the sewer entrance.
- Pick up the hose.
- Enter the sewer canal.
- Climb up the ladder (Nina will automatically change clothes again).
- Use the hose with the faucet.
- Pick up the hose and use it with the urinal.
- Use the faucet to get the water flowing.
- Go back to the sewer canal.
- Examine the distributor.
- Go to the passage through the door.
- Examine the pipe near the door.
- Use the stocking with the pipe.
- Use barrier tape with the stocking on the pipe.
- Go through the door.
- Turn the wheel.
- Go to the passage through the door.
- Pick up the stocking to get a stocking with key.
- Go through the door and climb up the ladder.
- Look through the opening.
- Give the stocking with key to the train driver.
- Go through the passage to the locker room.
- Use the radio on Nina to make a radio call. You need to state the right IDs for both the caller and the receiver. These are numbers you should have observed earlier.
- If you can't figure it out, it's number 15 (found by examining the radio) calling number 48 (learnt by talking to the soldier).
- Talk to central about FSB agents.
- Go through the door and enter the warehouse.
- Go through the door that the FSB agents were guarding.
- Examine Solotov to get his dog tags.
- Examine the dog tags.

- Return to the locker room.
- Open the locker on the left. Use the code to open the lock.
- If you can't figure it out, the correct code is: 31545.
- Examine the locker to find a permit.
- Go through the door and enter the warehouse, and then go through the passage to the platform.
- Give the permit to the soldier.
- Watch the cutscenes.
Train
- Go through the door on the right.
- Talk to the scientist.
- Talk to the assistant.
- Take white bread from the desk.
- Take white bread from the desk again to get another slice.
- Go through the passage back to the previous car.
- Take the bottle of orange juice and dried fruit that are in front of the sleeping soldier.
- Try flipping the light switch on and off to see what happens, if anything.
- Go through the sliding door on the left to enter the kitchen.
- Pick up honey from the shelf.
- Mix the bottle of orange juice, dried fruit, and honey in the pot that is on the sink. You will get an empty bottle after pouring the orange juice in. After mixing all three things, there will be a pot of jam on the sink.
- Use white bread with the pot of jam to get white bread with jam.
- Go back to the car where the scientist is.
- Give white bread with jam to the scientist.
- Talk to the assistant about everything.
- Talk to the scientist about everything.
- Use the door in the back to enter the next car.
- Try to enter the door in the back.
- Try to enter the door on the left, and try to use the intercom.
- Take the 100 watt bulb from the wall.
- Return to the first car where the kitchen is.
- Take the 25 watt bulb from the ceiling.
- Replace it with the 100 watt bulb.
- Flip the light switch. Watch what happens, and you will automatically end up in the kitchen.
- Come out when the situation has calmed.
- Search the soldier's bag to find castor oil.
- Go back to the kitchen.
- Use the empty bottle with the faucet to get a bottle with water.
- Pour castor oil into the pot with jam to create a pot with laxative jam.
- Dip white bread into the pot with laxative jam to get white bread with laxative jam.
- Go back to the car where the scientist and his assistant are.
- Give white bread with laxative jam to the scientist.
- Use the bottle with water with the power outlet that is next to the incinerator.
- Take the glass that is on the small desk to get a plant sample in jar.
- Examine the plant sample in jar to get a sample glass and a plant sample.
- Take the glass that is on the floor to get another plant sample in jar.
- Examine the plant sample in jar to get another sample glass and another plant sample.
- Combine the two plant samples into one plant sample.
- Put the plant sample into a sample glass, either one will work. This will be a plant sample in jar again.
- Put the plant sample in jar on the small desk.
- Watch the scene that follows.
- You will automatically end up in Sidorkin's office, so try to open the drawer first.
- Examine the book on the desk.
- Examine the documents on the desk.
- Examine the file folder on the desk.
- Examine the ant that is in the Petri dish.
- Examine the notes that are attached to the monitor.
- Watch the cutscene.
- After the cutscene, FSB agents have locked up Nina and taken away all but two inventory items. You may try the doors on each end of the car, but they are both locked.
- Try to take the piece of bone from the cage.
- Take the dog leash from the cage.
- Take a juicy steak from the ice chest. (OT: Just how can a frozen piece of meat be "juicy"?)
- Put the juicy steak into the glass jar to get meat in jar.
- Put the meat in jar into the right-side feeding hole of the cage.
- Take the piece of bone from the left-side feeding hole.
- Take the hose from the vacuum cleaner.
- Take the tube from the vacuum cleaner.
- Try to open the flap.
- Use the piece of bone with the flap.
- Examine the inside of the vacuum cleaner to get a vacuum cleaner bag.
- Examine the vacuum cleaner bag to get a barrette and animal hair.
- Use the dog leash with the tube to get a leash with pipe.
- Use the leash with pipe with the hatch in the ceiling to break the window.
- Use the leash with pipe with the hatch in the ceiling again to place the makeshift grappling hook.
- Exit through the hatch.
- Examine the two pipes that are sticking out.
- Use the animal hair on the right-side pipe.
- Use the hose on the left-side pipe.
- After the window has been opened, pick up the leash with pipe.
- Use the leash with pipe with the ventilation pipes.
- Use the window to re-enter the train.
- Watch a short cutscene.
- Back in Sidorkin's office, examine the desk.
- Use the barrette with the drawer to unlock it. Open the drawer.
- Take the statue.
- Pick up the flower vase that is near the door.
- Put the statue into the same socket where the flower vase was.
- There are four statues in the office. They all can be turned. The goal here is to turn them to open something somewhere.
- If you can't figure it out, they all should be looking in the same direction as Lenin on the wall, that is, facing left.
- Enter through the door that opens.
- Pick up the book that is on the torture chair.
- Exit and go back to the office.
- Use the book with books on the shelf, there is an empty spot where it fits nicely.
- Go back into the torture room.
- Examine the niche on the wall.
- Exit and go back to the office.
- Take the skull that is attached to the skeleton.
- Go back into the torture room.
- Put the skull into the niche to open a secret safe.
- Examine the safe to learn how the locking mechanism works. The goal here is to turn all the lights off.
- If you can't figure it out, here's how it works: every time you touch a lamp, it switches state, from lit to unlit and vice versa. Not only does the lamp that is touched change, but so does every lamp that is up, down, left and right from that lamp. There are many ways to solve this, but the basic formula is to switch the lights so that the remaining ones can be turned off with a single click. One of the easiest ways to accomplish this is to have the last lit lamps be in the corner, as there are only three lamps to switch state, instead of four or five.
- If you still can't figure it out, here's the correct solution (not the only one). This solution uses spreadsheet cell numbering, where rows go from 1 to 5 and columns go from A to E. So click the lights in the following sequence: A1 - B3 - D2 - C3 - B5 - A1 - A5.
- Watch the cutscenes and conversations that follow.
Hospital
- Now you have been automatically switched to Max, with a new (at this point mostly empty) inventory.
- Use the intercom at the gate.
- Pick up the textile bag from the bus stop.
- Pick up some red berries from the shrub.
- Use the red berries with the textile bag to get a dirty bag.
- Give the dirty bag to Oleg.
- Look at the ambulance on the other side of the gate.
- Use the cell phone on Max to make a phone call, and call ambulance.
- Watch the cutscene.
- Now you are in the courtyard. First, look at the shadow on the ground.
- Examine the lamp on the wall.
- Try to interact with the lamp.
- Take the surgery pliers that are in the container.
- Use the surgery pliers with the lamp to get a key.
- Use the key to unlock the door.
- Enter through the door.
- Examine the file cabinet.
- Examine the dictation machine on the operating table.
- Use the door to go to the next room.
- Try to use the door to go from this room to the next room again.
- Take the stethoscope from the operating table.
- Use the stethoscope on the door.
- Take the syringe that is near the fourth wall.
- Take the scalpel that is also near the fourth wall.
- Take ammonia gas that is near the door.
- Go back to the previous room through the door.
- Take the handheld fan that is on top of the file cabinet.
- There are bottles on the shelf near the exit, take anesthetic from there.
- Exit to the courtyard.
- Examine the pipe that is attached to the wall.
- Use the stethoscope on the pipe.
- Use ammonia gas with the pipe.
- Use the handheld fan with the pipe.
- Watch the conversation that follows.
- After the conversation you are able to switch between Max and Nina.
- Activate Nina.
- Pick up the small stone from the ground.
- Pick up the crocheted place mat that is on the mattress.
- There is a crack on the wall, labelled as sharp edge. Use the crocheted place mat with the sharp edge to get a thread.
- Use the thread with the small stone to get a tied-up stone and a fiber.
- Use the tied-up stone with the drain on the floor. Now you can use the drainpipe to exchange small objects between Nina and Max.
- Activate Max.
- Use the scalpel with the pipe.
- Activate Nina.
- Use the scalpel with the mattress to get foam.
- Use the scalpel with the chair leg to get a chair leg.
- Use foam with the drain.
- Use the chair leg with the drain.
- Activate Max.
- Go to the passage on the left.
- Use the surgery pliers with the satellite dish on the wall.
- Go back to the previous area where the pipe is.
- Enter through the door, and use the door to go to the next room.
- Go through the door that was blocked by the guy earlier.
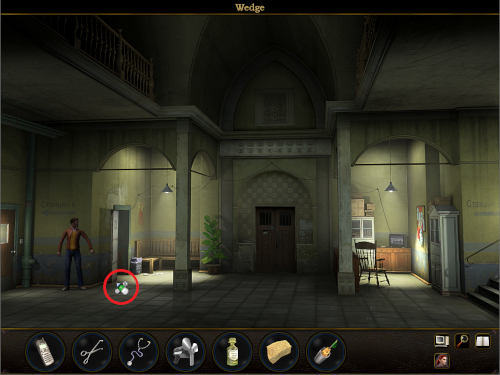
- Take the wedge that is keeping the door ajar.
- Use the syringe with the chair leg to get a blowgun.
- Use anesthetic with the blowgun to get a poisoned blowgun.
- Use poisoned blowgun with the peephole.
- Take a tack from the pinboard.
- Use the foam with the dish that is next to the television to get cheesy foam.
- Go back to the courtyard where the pipe is.
- Use the chair leg with the pipe.
- Use the cheesy foam with the pipe.
- Activate Nina.
- Pick up the bowl from the ground.
- Use the fiber with the cheesy foam to get tied-up cheesy foam.
- Use the chair leg with the bowl to get a rat trap.
- Use the tied-up cheesy foam with the rat trap to get a rat trap with bait.
- Use the rat trap with bait with the rathole.
- Pick up the rat trap to get a rat.
- Use the rat with the drain.
- Activate Max.
- Go back to where you last came from through the operating rooms.
- Use the stairs to go upstairs.
- Use the rat with the guard to make him leave.
- Use the tack with anesthetic to get a poisoned tack.
- Use the poisoned tack with the chair.
- You will automatically come downstairs, so use the stairs to go upstairs again.
- Examine the guard to find the key to cell.
- Use the key to cell to unlock the door.
- Watch the cutscenes.
Tunguska
- Examine the Jeep.
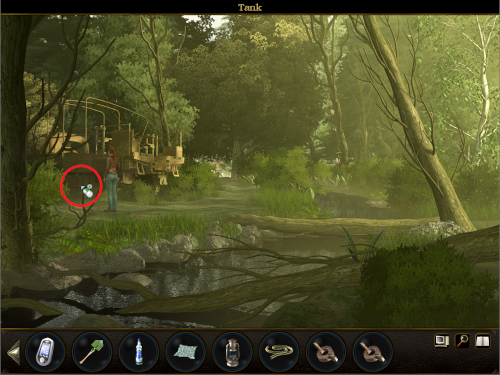
- Take the first aid kit.
- Examine the first aid kit to get vodka.
- Take the ketchup.
- Take the spade from the back of the Jeep.
- Walk to the right a bit and enter the tent.
- Try to talk to the old man, Evenk.
- Take the cup that is near Evenk.
- Take the scissors that are hanging from the pillar.
- Interact with snippets of parchment in the fireplace.
- Take the grate from the fireplace.
- Take a tassel that is hanging to get twine.
- Take the wooden spoon that is next to the nutcracker.
- Exit the tent.
- Try to interact with the crate that is next to the tent.
- Use the spade on the crate to destroy it.
- Pick up debris from a crate.
- Walk to the right a bit to see a tree.
- Use the spade on the tree to get a huge bit of bark.
- Use the cup on the resin that is exposed. The inventory label won't change, but the cup is full of resin.
- Go right to the path.
- Pick up the pointed stone.
- Use the scissors on the pointed stone to get sharp scissors.
- Go back to the Jeep.
- Examine the water basin.
- Examine the barrel.
- Use the bark with the barrel.
- Pull the plug from the barrel to make the water run.
- Use the cup with the water basin. Again, the inventory label won't change, but the cup will have a different icon.
- Use sharp scissors with the reindeer to get reindeer hair.
- Go right to the path.
- Use the spade with the gentian to get the gentian.
- Put the grate over the hole in the ground.
- Use the cup with the grate.
- Take the cup from the grate. The contents will melt, but the inventory label still won't change.
- Take the grate.
- Return to the tent.
- Use reindeer hair with the twine to get a wisp of hair.
- Use the wisp of hair with the wooden spoon to get a brush.
- Use the brush with the cup to get a brush with resin.
- Use the brush with resin with the snippets of parchment to get a recipe. "5 parts of the Source of Life, 2 parts of Root of Tears, 1 part Blood of the Night, 3 parts Drops of Intoxication."
- Show the recipe to Evenk, and he gives a vial to mix it in.
- Exit the tent and go back to the Jeep.
- Use the vial with the water basin (water is the Source of Life).
- Enter the tent.
- Use the vial with the nutcracker.
- Use the gentian with the nutcracker (the bulb is the Root of Tears).
- Take the vial.
- Use the ketchup with the vial (ketchup is Blood of the Night).
- Use vodka with the vial (vodka is Drops of Intoxication).
- Put debris from a crate into the fireplace.
- Use matches with the fireplace.
- Use the grate with the fireplace.
- Use the vial with the grate.
- Take the vial.
- Give the vial to Evenk.
- Watch the conversation that follows.
- After the conversation, you are in a new area, so enter the house first.
- Examine the projector and try to use it.
- Examine the compass and try to use it.
- Look out of the window.
- Pick up a rag.
- Exit the house.
- Use the rag with the window.
- Go to the path on the left side of the house.
- Try to start the generator.
- Take the oil lamp that is near the generator.
- Take the hose from the tanker.
- Continue along the path into the forest.
- Examine the wheel rim of the truck wreck to get a nut and another nut.
- Use the hose with the tank. This may require some pixel hunting; it's near where a bush hides part of the wreck.
- Use the vodka (bottle) with the tank to get a bottle with diesel fuel.
- Return to the generator.
- Use the bottle with diesel fuel with the generator.
- Use either one of the nuts with the coil on the generator. Doing this once will magnetise them both.
- Go back to the house along the path.
- Enter the house again.
- Examine the chimney.
- Use the rag with the oil lamp to get a saturated rag.
- Use matches with the oil lamp.
- Pick up aluminum foil.
- Use the saturated rag with the chimney to clean it.
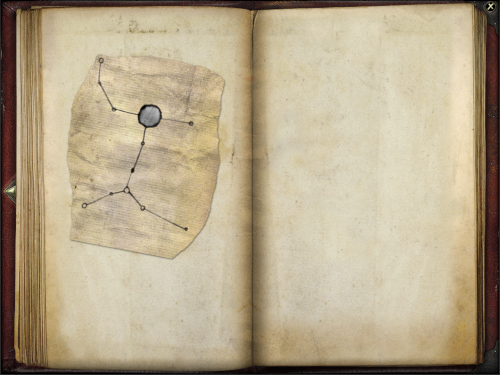
- Examine the chimney. There are numbers: 7 ½ - 3 - 10 ½ - 6.
- Examine the compass. The goal here is to use the numbers from the chimney with the compass.
- If you can't figure it out, the numbers are clock positions, not real compass headings. So the compass needs to be pointing to what those numbers would show on a clock.
- Here's how the mechanism works: using the magnetised nuts will draw the compass needle towards them when those nuts are attached to the pegs on the compass. Using a single nut will work in a very straightforward manner, the needle will point to the nut. Using two nuts creates two equal forces that both draw the needle, but only to the point of equilibrium. Pushing the button will move the needle. Follow those rules to input the numbers into the compass.
- If you can't figure it out, here are the right steps: SW - E - NW - S. If done correctly, a secret compartment in the chimney opens.
- Examine the secret compartment to get some information about the event and a film reel.
- Use the film reel with the projector.
- Try to use the projector.
- Pick up the glass shard that is on the floor.
- Use the glass shard with the aluminum foil to get a shard in aluminum foil.
- Use the shard in aluminum foil with the projector.
- Use the projector.
- Watch the cutscenes.
Cuba
- Talk to the gate keeper about everything.
- Go through the gate.
- Talk to the worker about everything.
- Go back through the gate.
- Enter the asylum through the door.
- Talk to the female nurse about everything.
- Take a newspaper from the magazine stand.
- Enter the passage on the lower right.
- Talk to the patient about everything.
- Take the glasses that are near the record player.
- Return to the gate.
- Talk to the gate keeper about everything again.
- Go through the gate to the courtyard where the worker is.
- Take a log from the pile of wood.
- Go through the open door to enter the kitchen.
- Use the log with the stove.
- Use the newspaper with the stove.
- Use the glasses with the stove.
- Take the sausage tongs from the shelf.
- Use the sausage tongs with the stove to get a charred log. (The inventory label is singular, while the picture clearly shows two logs. Go figure.)
- Take the meat fork that is near the plates.
- Take the weights that are near the tray.
- Go through the door to the courtyard, and then through the gate.
- Give the charred log to the gate keeper.
- Enter the asylum through the door.
- Enter the passage on the lower right.
- Use the weights with the record player.
- Return to the gate.
- Talk to the gate keeper about the portrait of Sabrina to get a wrapped portrait.
- Enter the asylum through the door.
- Give the wrapped portrait to the female nurse. After a short conversation you will have two separate items in the inventory: a bag, and the portrait of Sabrina.
- Return to the courtyard where the worker is.
- Go through the open door to enter the kitchen.
- Use the bag with the stove.
- Go through the door to the courtyard, and then through the gate.
- Enter the asylum through the door.
- Enter the passage on the lower right.
- Use the portrait of Sabrina with the copier to get copied pictures.
- Go through the door to the entrance.
- Give the copied pictures to the female nurse.
- Go to the passage that opens.
- Enter the door on the right.
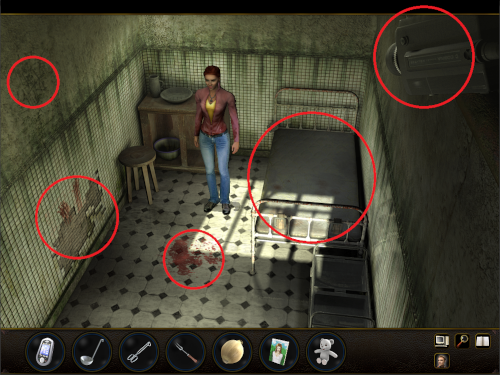
- Examine the bed.
- Examine the scratches on the wall.
- Examine tiles that fell out on the wall.
- Examine stains on the floor.
- Examine the surveillance camera on the wall.
- Exit the room.
- Exit the corridor to go back to the entrance.
- Talk to the female nurse about everything.
- Go back to the courtyard.
- Watch a short scene.
- Use the meat fork with the portrait of Sabrina to get a skewered portrait.
- Use the skewered portrait with the door frame.
- Enter through the door that can now be opened.
- Examine the picture on the wall to get hints about the numbers to open the safe.
- If you can't figure it out, count the number of legs in the picture.
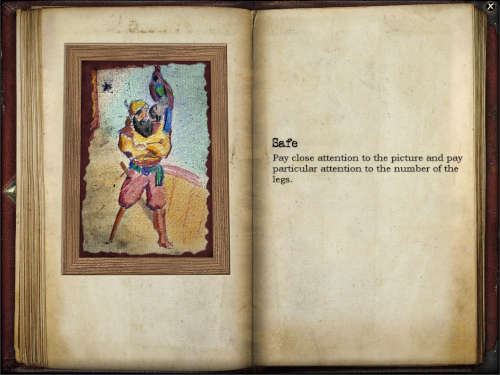
- If you still can't figure it out, the numbers are: 1428.
- Use the numbers to open the safe and get a videotape.
- Use the videotape with the VCR.
- Watch the videotape and the conversation that follows.
- After the conversation you end up near a cave where Perez is hiding. Try to talk to Perez about everything.
- Climb the stairs to return to the asylum. (The hotspot for "stairs" is illogically on the beach!)
- Go through the gate to the courtyard.
- Take the skewered portrait from the door frame to get the portrait of Sabrina and the meat fork back again.
- Go through the open door to enter the kitchen.
- Use the sausage tongs with the stove to get a charred log.
- Go through the door to the courtyard, and then through the gate.
- Go to beach, which is to the left.
- Give the portrait of Sabrina to Perez.
- Give the charred log to Perez.
- Watch a scene that follows.
Ireland
- Now you have been automatically switched to Max again.
- Enter the pub through the door.
- Talk to the barkeeper about everything.
- Try to talk to the guest (Klaus).
- Take the tumbler that is in front of him.
- Leave the pub and go outside.
- Climb down the stairs that lead to the beach.
- Talk to the fisherman about everything.
- Take a fish from the barrel with fish.
- Use the tumbler with sea to get a tumbler with water.
- Climb up the stairs.
- Take the sign that is swinging in the wind.
- Take the flag that is next to the door.
- Enter the pub through the door.
- Use the fish with the sign to get a fish on sign.
- Use the fish on sign with the chimney.
- Try to take the fish on baking sheet.
- Use the tumbler with water with the flag to get a wet flag.
- Use the wet flag with the fish on baking sheet to get a fried fish on sign.
- Use the fried fish on sign with the guest to wake him up.
- Talk to the barkeeper about everything.
- Leave the pub and go outside.
- Climb down the stairs that lead to the beach.
- Use the tumbler with sea to get a tumbler with water.
- Climb up the stairs.
- Put the wet flag over the traffic sign.
- Enter the pub through the door.
- Leave the pub and go outside.
- Open the crate that has fallen on the road to get a lemon.
- Enter the pub through the door.
- Give the lemon to the barkeeper.
- Put the tumbler with water in the chimney.
- Take the tumbler.
- Examine the tumbler to get salt.
- Use the salt with the tumbler that the barkeeper left on the bar desk.
- Watch a scene that follows.
- After the scene, take the key from the bar.
- Leave the pub and go outside.
- Climb down the stairs that lead to the beach.
- Use the key on the door to unlock it.
- Enter the cellar through the door.
- Take the torch from the pillar.
- Take a whiskey bottle from the shelf.
- Exit the cave.
- Take the stone that is on the ground near the cellar door.
- Give the whiskey bottle to the fisherman.
- Use the boat.
- Watch the cutscene.
- Go to the passage on the right side.
- Use the torch in the inventory with the torch on the wall to get a burning torch.
- Examine the coffin.
- Go back through the passage.
- Enter through the door that is between two passages.
- Examine the painting on the wall.
- Use the stairs to go upstairs.
- Examine books.
- Take spearheads from the showcase.
- Try to operate the lever next to the showcase.
- Take the oil lamp that is near the stairs.
- Use the stairs to go downstairs.
- Exit through the door.
- Go to the passage on the left side.
- Take the wire that is on the wall near the unlabelled candle holder.
- Go through the passage on the right to enter a torture chamber.
- Use the burning torch with the fireplace.
- Pick up pliers from the floor.
- Take the iron chain that is next to the iron maiden.
- Exit the torture chamber.
- Enter through the door that is a few steps further from the torture chamber passage.
- Examine the statue.
- Examine the commode to find a gold coin.
- Exit through the door.
- Go to the passage that leads to the torture chamber.
- Use the gold coin with the pliers to get pliers with gold coin.
- Use the pliers with gold coin with the fireplace to get pliers with red-hot gold coin.
- Use the pliers with red-hot gold coin with the iron maiden to get pliers with red-hot gold ring.
- Leave the room and go outside.
- Go to boat.
- Use the pliers with red-hot gold coin with sea to get a gold ring and pliers. (An alternative but more complicated way is to first use the tumbler with sea to get a tumbler with water. Then use the pliers with red-hot gold coin with the tumbler with water to get the same outcome.)
- Enter the cellar through the door.
- Use the pliers with the board that is attached to the barrels to get a long board.
- Use the spearheads with the bench vice.
- Use the long board with the spearheads to get a board.
- Exit the cave.
- Climb up the stairs.
- Take the rain gutter that is near the door of the pub. This may require some pixel hunting.

- Climb down the stairs that lead to the beach.
- Use the boat.
- Enter through the door that is between two passages.
- Use the board with the stool that is in front of the chimney.
- Use the stone with the board.
- Use the stairs to go upstairs.
- Operate the lever next to the showcase.
- Use the stairs to go downstairs.
- Exit through the door.
- Pick up the chimney cover that just flew to the ground.
- Pull the sword from the stone that is next to the well.
- Take the shutter that is in front of a window.
- Go to the passage on the left side.
- Go to the passage that leads to the torture chamber.
- Use the rain gutter with the rack.
- Pick up the rain gutter from the rack. The label won't change, but the inventory icon now shows two pieces.
- Exit the torture chamber.
- Enter through the door that leads to the bedroom, a few steps further from the torture chamber passage.
- Use the rain gutter with the statue.
- Use the chimney cover with the statue.
- Use the rain gutter with the statue.
- Use the shutter with the statue.
- Use the sword with the statue.
- Use the gold ring with the statue.
- Pull the curtain on the right side of the room.
- Enter the passage that is revealed.
- Go left until you find a small niche.
- Examine the niche to find a key.
- Exit the area and go outside.
- Go to the passage on the right side.
- Use the oil lamp with the coffin.
- Use the burning torch with the coffin.
- Watch a short cutscene.
- Examine the small opening in the coffin.
- Use the key with the opening.
- Pick up an amulet from the coffin.
- Go back through the passage.
- Go to the passage on the left side.
- Enter through the door that leads to the bedroom.
- Use the wire with the amulet to get an amulet with wire.
- Use the amulet with wire with the iron chain to get an amulet on a chain.
- Use the amulet on a chain with the statue.
- Enter the passage that was revealed earlier.
- Keep walking until you reach an exit, and then go through that exit.
- Open the vault-type door.
- Watch the conversations and cutscenes that follow.
China
- Examine the message in the inventory.
- Take the skull to get a skull and a peg.
- Go to the passage on the left.
- Use the peg with the rock to push it down and cause the water level to rise.
- Pick up the bag from the water.
- Examine the bag to get a bone.
- Return to the first cave through the passage.
- Examine the holes in the rock.
- Use the bone with the lowest hole.
- Go to the passage on the left.
- Enter the passage that has opened.
- Examine the stone slab that is in the head of stone. The goal here is to rearrange the stones.
- If you can't figure it out, check the last pages of the messages for help.
- If you still can't figure it out, here's the right solution.
- Examine the stone disk that is revealed.
- Watch the scene that follows.
Antarctica
- When you wake up again in the bathtub, all inventory is gone. This time completely gone. So the first order of business is to start looting stuff.
- Try to use the bathtub to see what happens.
- Try to interact with the camera.
- Take a plunger from the right side of the room.
- Take some toilet paper that is found near the door.
- Exit the room through the door.
- Try to open the door on the left.
- Take the key that is near the door.
- Try to use the key to unlock the door.
- Examine the incubator and try to operate it.
- Examine the armoire on the wall to take everything from it: a tapper, a piece of something, and silicone.
- Take the metal plate from the bench.
- Use the metal plate with the drill.
- Use toilet paper with the metal plate.
- Operate the drill.
- Use the piece of something with the bench vice to get a bent piece of something.
- Use the bent piece of something with the key to get a piece of metal and key.
- Use the piece of metal and key with the burning paper to get a piece of metal and hot key.
- Use the piece of metal and hot key to unlock the door.
- Go through the door.
- Examine the keypad.
- Examine the platform below.
- Go through the door with the red glow on the left to enter the control room.
- Watch a short cutscene.
- Examine the armoire to get an explosive.
- Leave the control room.
- Use the stairs on the right.
- Examine the switch and try to operate it.
- Examine the machine and try to operate it.
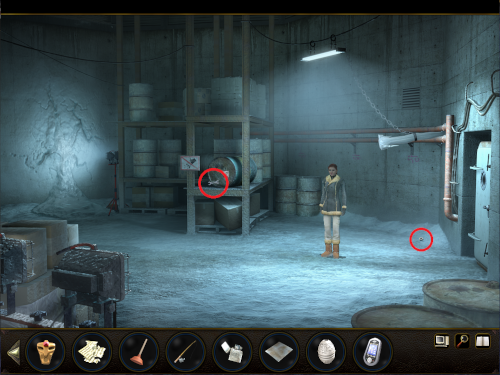
- Take the fishing rod that is leaning against the railing.
- Use the stairs on the left.
- Use the fishing rod with the platform to get winter clothing. Nina will automatically wear it and can go outside now.
- Use the fishing rod with the platform again to get a laundry ball.
- Use the stairs on the left.
- Exit to the right to go outside.
- Take the bucket from the snow.
- Leave area (an actual hotspot label on the left).
- Examine the penguin.
- Examine the sign.
- Take the sign.
- Examine the crevasse.
- Use the explosive with the hole.
- Go down to the crevasse.
- Examine the dead man to get an amulet, a lighter, and a diary.
- Examine the diary.
- Examine the amulet.
- Go back up.
- Go to station.
- Leave area (an actual hotspot label on the right).
- Examine the hole in ice.
- Examine the jacket that is on the whaling ship to find a hip flask.
- Examine the barrel that is nearby.
- Use the laundry ball with the barrel to get a laundry ball in whale oil.
- Go to station.
- Use the station entry to go back inside.
- Use the stairs on the left.
- Go through the door that leads back to the workshop.
- Use the plunger with the incubator.
- Use the amulet with the incubator to get a strange egg.
- Examine the strange egg.
- Go through the door that you came through.
- Use the laundry ball in whale oil with the platform where it was first found.
- Use the stairs on the right.
- Use the bucket with the salt pile that has emerged to get a bucket of salt.
- Exit to the right to go outside.
- Leave area (an actual hotspot label on the right).
- Use the bucket of salt with the hole in ice.
- It takes time for the salt to melt the ice. (Note that this is actually physics-wise incorrect. Salt is actually used to prevent ice from forming, not to melt already formed ice, especially not in such extreme coldness as Antarctica, where salt would simply get mixed with snow and ice. If salt as such would cause ice to melt, there wouldn't be Antarctica, because it's surrounded by the salty seawater...) Go anywhere indoors and then return to see the results. Illogically, spending time and going around outside doesn't work, but simply entering and immediately exiting the station works.
- Try to use the fishing rod with the hole in the ice.
- Use the lighter with the fishing rod to get a fishing rod with bait.
- Use the fishing rod with bait with the hole in the ice to get a fish.
- Go to station.
- Leave area (an actual hotspot label on the left).
- Give the fish to the penguin.
- Use the strange egg with the egg in the snow to get an egg.
- Go to station.
- Use the station entry to go back inside.
- Use the egg with the machine.
- Use the stairs on the left.
- Go through the door that leads back to the workshop.
- Go through the door that leads to the bathroom.
- Try to use the bathtub to see what happens.
- Exit the room through the door.
- Use the hip flask with the drill.
- Operate the drill to get a cork.
- Go through the door that leads to the bathroom.
- Use the cork with the bathtub.
- Use the bathtub to fill it with water.
- Go back to the machine.
- Take the egg again.
- Go all the way back to the bathroom again.
- Examine the bathtub.
- Take the VHS tape from the camera.
- Go back to the control room.
- Use the VHS tape with the VCR.
- Watch the scene that follows.
- Check the diary entry "The lion appears", especially the picture.
- Leave the control room.
- Use the keypad. Enter the numbers you learnt from the diary.
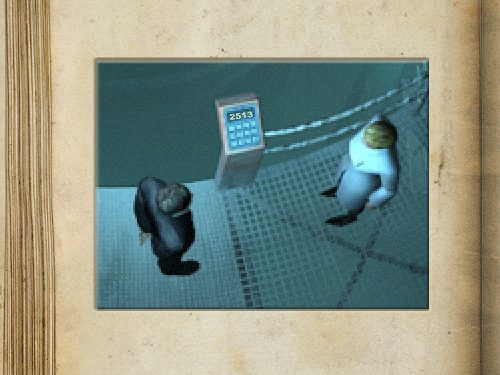
- If you can't figure it out, the correct code is: 2513.
- Open the door that is now accessible.
- Examine the radar.
- Take a beacon and matches from the crate.
- Exit the room.
- Use the stairs on the right.
- Exit to the right to go outside.
- Leave area (an actual hotspot label on the right).
- Use the beacon with the barrel.
- Use the beacon with the harpoon launcher.
- Watch the cutscene and conversations that follow.
- Back inside the station, use the elevator to go down.
- Try to turn the valve.
- Try to open the vault-type door on the right.
- Try to take the icicle.
- Use the sign with the icicle to get the icicle.
- Enter through the door on the left.
- Take the wrench that is in front of the barrel. This may require some pixel hunting.
- Examine the danger sign.
- Try to take the danger sign.
- Use silicone with the danger sign to get a mold.
- Use the icicle with the chain.
- Push the chain between the pipes on the wall.
- Pick up the nut that falls to the ground. This may require some pixel hunting.
- Go back to the previous room.
- Use the tapper with the valve.
- Use the nut with the valve.
- Use the wrench with the sign to get an extended wrench.
- Use the extended wrench with the valve.
- Interact with the radiator.
- Examine the mold.
- Use the mold with the camera on the wall.
- Use the lighter with the camera on the wall.
- Watch the conversations that follow.
- You end up with the bad guys. You can talk to Massimo about a few things if you want to.
- Give the egg to Oleg.
- Use the cell phone with the machine.
- Interact with the camera and point it towards the crane.
- Watch the cutscenes, credits, and "bloopers".