The Antidote walkthrough
About this walkthrough
This is a complete walkthrough for The Antidote.
Using this walkthrough will get you through the game with the least amount of time and wandering around, but may spoil the game and fun of exploring.
Items which can be picked up as inventory items and items which can be constructed by combining or using other items are written with bold text for emphasis.
- Watch the opening scene and the protagonist will also give you a brief tutorial. When the game starts, it's a good idea to talk to all inanimate objects and inventory objects, sometimes for laughs, sometimes for a good hint.
- Search lost and found box to get a glass guitar slider and boots.
- Check the wall next to the box. Keep checking walls until you find some kind of weak spot. If you can't find it, it's at the opposite side of the room.
- When something sounds hollow, push that part of the wall again to find an alarm.
- Interact with the alarm to see a computer. Watch the computer screen.
- Look around in the room. Look family weapon near the ceiling and observe what it is written on it: "Superavit Plurimi Et Effugit Deis" and "1572".
- Interact with the alarm again to use the computer. Use the previous observations to guess the password. If you can't figure it out, it's "SPEED".
- After the forcefield is deactivated, look around in the room. After you exit the room, every new room you enter will show up on the map which can be used to teleport to that location.
- You can look at the showcase to see what it's holding inside.
- Interact with the plant to get mustard seeds.
- Study the fusebox by the stairs to find out that a fuse is missing.
- Use the door right from the fusebox to enter the courtyard.
- Talk to wishing well about everything.
- Try to interact with the tree.
- Use the door behind the tree on the backwall to enter a corridor.
- Look at the two paintings on the wall.
- Look at the note on the locked door.
- Go back to the courtyard.
- Use the door on the right to enter the library.
- Take the letter opener from the nearest table (farthest from the player's viewpoint).
- Take the fireplace poker from the fireplace.
- There's a pen on a book next to ouija board, take the pen. You can also talk to the pen to get a small hint about the upcoming events.
- Go upstairs and go to the shelf that has interesting books. Search it to find The Book of Useless Facts. You can browse through the book briefly, the book will help solving several puzzles.
- Read the useless warnings from The Book of Useless Facts. Especially read the second item, "Warning: Do not feed the wishing well".
- Use the door between upstairs bookshelves to enter the weapons room.
- Take the sign near the farthest door (the one you just entered through in this walkthrough) to get an empty sign.
- Take the slingshot from the left.
- Take a cannonball from pile of cannonballs on the right side.
- Go through the door on the right to enter an unknown room.
- Welcome to one of the most bizarre puzzles in the game, or even the entire adventure genre! Obviously you need to pick up the aluminium that is floating up in the air, but you are too short. The solution? You need to walk around in the room, and your size keeps changing. Keep walking until you are very tall, and located under the aluminium, then pick up (or down?) the aluminium. Look at the right spot from the picture below, if all else fails.
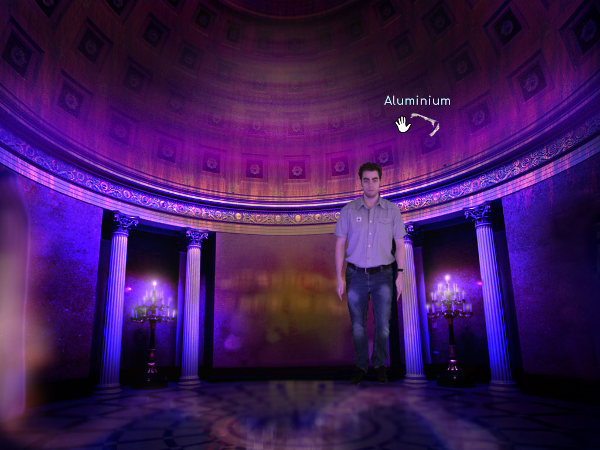 The right spot.
- Go back to the courtyard.
- Use the empty sign in the inventory on The Book of Useless Facts, specifically use it on "Warning: Do not feed the wishing well" to get a written sign.
- Use the written sign on the wishing well.
- Take the coins from the ground, and keep in mind what the wishing well said about combining items for you.
- Look into the well. Use the fireplace poker on the bucket to get a bucket of water.
- Return to the lobby.
- Use the letter opener on the alarm to get copper wires.
- Use copper wires with the glass guitar slider to get a wire in glass slider.
- Use coins on the wire in glass slider to get a fuse.
- Go to the fusebox and use the fuse on that.
- A short cutscene will follow, watch it.
- After the cutscene, use the fireplace poker on the showcase to get a jacket and blue pants.
- Use the door on the left side of the stairs to enter the Western corridor, as opposed to the Eastern corridor from before.
- Welcome to another very bizarre puzzle. Like in the unknown room before, you need to find a right place to stand in. Walk a little bit further along the corridor, until the light in the room changes to (presumably) ultraviolet light. Look at the right spot from the picture below, if all else fails.
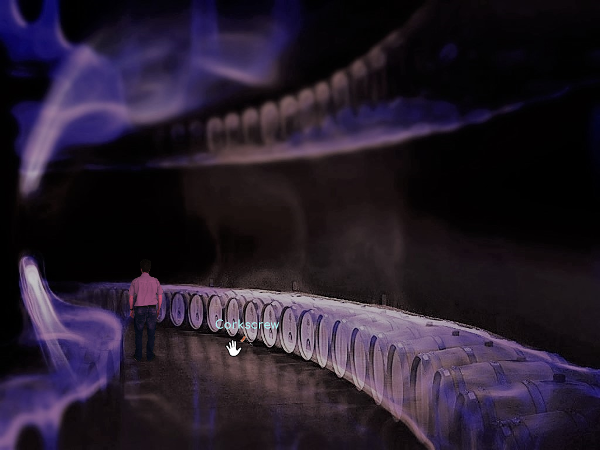 The right spot.
- In the ultraviolet light, you can see a corkscrew between a couple of barrels, pick it up.
- Use the exit at the end of the corridor to enter the wine cellar.
- Try to interact with the wine barrel, that's the one that has a faucet on it.
- Try to use the fireplace poker to break the wine barrel.
- Return to the Eastern corridor.
- Use the fireplace poker with the torch light to make a crowbar.
- If you already haven't, read the note on the door that tells only a GeNiUS can enter.
- Open The Book of Useless Facts and look at the periodic table. Check the atomic numbers for Germanium (Ge), Nickel (Ni), Uranium (U), and Sulfur (S). If you can't figure it out, the correct numbers are: 32 28 92 16.
- Interact with the lock on the door, and enter the numbers from above into the combination lock.
- Open the door to watch a cutscene and enter the dining hall.
- Take some food from the table to get a meatball.
- Take a placemat from the table to get a paper placemat.
- Return to the wine cellar.
- Use the crowbar to break the wine barrel.
- Pick up the faucet from the ground (note, it's not labelled).
- Go through the wine barrel to watch a cutscene and enter the dungeon.
- Talk to mr. Slave about everything.
- Talk to the electric chair.
- Use copper wires with the electric chair to get a battery.
- Use the letter opener with the crack in the wall to get a love letter.
- Read the love letter.
- Use the door to enter the crypt.
- Read the plaque on the wall.
- Talk to Ben Dover about everything.
- Look at the door in the back.
- Go back to the library.
- Use ouija board, write "Carrie Dover" and then choose Yes.
- Talk to the ghost about everything.
- When the ghost asks about the wedding date, use the date that was in the letter. Use ouija board, write "20 10 1979" and then choose Yes.
- Finish the conversation with the ghost.
- After the conversation a short cutscene will follow.
- After the cutscene return to the dining hall.
- Use aluminium with battery to get a makeshift lighter.
- Use the makeshift lighter on fireplace.
- Use the bucket of water with the fireplace (that is now unlabelled for some reason).
- Use blue pants with the (still unlabelled) fireplace to get shrunk pants.
- Go back to the courtyard.
- Interact with the plant to get chili peppers.
- Pick up red berries from berry bushes.
- Use faucet with the tree and you will automatically get some resin.
- Return to the dungeon.
- Use the letter opener on the slingshot to get a rubber band.
- Use the cannonball with the rubber band to get a rubber band with ball.
- Use resin on the rubber band with ball to get a ballgag.
- Use the ballgag on mr. Slave to cause him pain.
- Talk to mr. Slave about everything.
- Put red berries in the bassin.
- Crush the red berries.
- Use shrunk pants in the bassin to get red shrunk pants.
- Go back to the weapons room.
- Use the corkscrew with barrels.
- Take some gunpowder by interacting with barrels (note that there's no hotspot for gunpowder).
- Use the chili pepper with meatball.
- Use mustard seeds with meatball.
- Use gunpowder with meatball to get a spicy meatball.
- Go back to the courtyard.
- Read The Book of Useless Facts, turn to the page with the article "How to Creat a Paper Hat".
- Use paper placemat on the said article to get a hat.
- Throw hat, red shrunk pants, jacket, and boots into the wishing well. You will get a perfect costume in return.
- Talk to wishing well about everything, especially if you already haven't.
- Return to the dungeon.
- Give spicy meatball to mr. Slave.
- Pick up a key from the floor.
- Go to the crypt.
- Give the costume to Ben Dover.
- Talk to Ben Dover about everything.
- Push the heavy sarcophagus.
- Pick up a key.
- Go to the door in the back.
- Look at the door, and then look at both keys in the inventory. There are chords in the door, and the two keys are E and Cm. Insert these keys to corresponding spaces on the door.
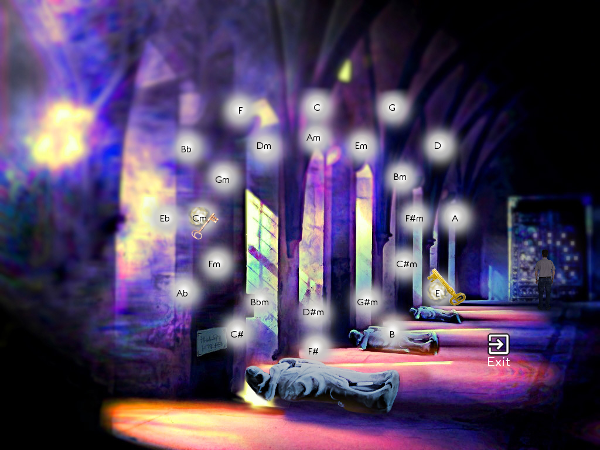 The right keys.
- Interact with the door to enter.
- Look at the vault. Is the antidote in there? The vault must opened first to find that out. The lock has the number 1572 on it, which is important. You must operate the four number slots to produce a corresponding number, 1572, below the lock. Start by changing numbers from 0 to 1 individually to see what happens, and click the green check mark to perform calculation. In the end you should find the right combination to get 1572.
- If you can't figure it out, here's how the puzzle works. If the third number is zero, you get a message about some number being zero. This means that it's a division, where divisor can't be zero. This not only eliminates one potential number from that slot, but it also tells that this slot divides something. 0010 and 1010 both produce zero, but 1110 produces 1, 2110 produces 4, and 3110 produces 9, and so on. This means that the first slot is x squared, the number multiplied by itself. 1110, 1210, and 1310 produce the same numbers as before, so from that it is obvious that the second slot is y squared, another number multiplied by itself. Trying out different combinations there proves that the first two slots are x squared multiplied by y squared. For instance 2310 or 3210 both produce 36. To test this, insert for instance 2220 which produces 8, because ((2*2)*(2*2)) / 2 = 8. Now, to test with the last number, 2220 produces 8, 2221 produces 9, 2222 produces 10 and so on. This means that whatever number the first three multiplication and division calculations produce, will be added with the last number in a straightforward plus calculation. So there is the logic of the puzzle. From there on it's simply mathematics to find the right combination, have fun!
- If you REALLY can't figure it, just enter 8724 or 7824 to get it open. To test this with a calculator, calculate ((8*8)*(7*7)) / 2 + 4. It's 1572.
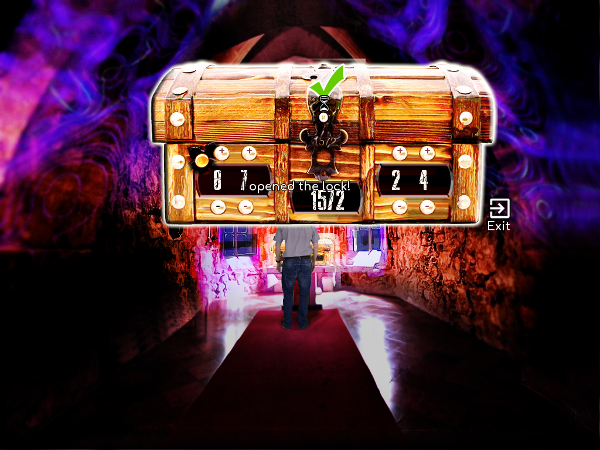 The right combination.
- Watch the cutscene.
- After the cutscene the drug has worn off, and the world looks different. Choose dowser in the inventory, and follow the advice about moving it slowly around the screen. Try to find a suitable spot for escape.
- When you find the right tile to break, choose stump from poker and start breaking the floor with it. The right place is on the right side of the screen, near the spot where the reflection from the window is brightest.
 The right spot.
- After finding and breaking the right tile, you will automatically re-enter the unknown room, where the protagonist was changing size last time. This time there is a cryptic message on the wall. The message is as follows:
ᛁن1572 をᚢᚱ ᚠᚨᛖᛁᛚᛋ ᛒまᚨ ᚱᛟᛋ
ᛚ.ᚹ ᚺᚨᛏ ᚨᚱ ᛏᚺ ᛟᛞدᛇ?
- The goal here is to find non-runic writing which contains a hidden message. Read The Book of Useless Facts and see the page about foreign scripts alphabets.
- If you can't figure it out, the message spells out NOMAD. The first N comes from the Arabic writing. The next part is confusing, because O comes from Japanese hiragana syllables, but rather than being "the real" O, the developers have picked the object marker (W)O, either because they wanted to make the puzzle more challenging or because they have no knowledge about Japanese language. The next non-runic character is MA from hiragana, and the last one is D from Arabic.
- Interact with the cryptic message and type "nomad" when prompted to exit the unknown room, and interact with the message after it is gone to enter the weapons room.
- Look at guns near the door on the left.
- Use the paperclip from the inventory on the guns to get a flintstone.
- Go through the left door to enter the lobby.
- Have a brief discussion in the lobby, after which use the door on the left side of the stairs to enter the Western corridor.
- Walk through the corridor into the wine cellar, and go through the open wine barrel to enter the dungeon.
- Take a bone from the skeleton, note that neither the bone nor the skeleton are labelled for some reason.
- Return to the lobby.
- Use the door right from the fusebox to enter the courtyard.
- Use the door on the right to enter the library.
- Take the (unlabelled) oil canister that is next to the fireplace.
- Go back to the courtyard.
- Interact with the wishing well to enter it.
- Try to enter the dark hole.
- Combine the costume and bone to have a bone with cloth.
- Use oil canister on the bone with cloth to get a torch.
- Use the flintstone on the torch to get a lit torch.
- Now you can enter the dark hole, but rather than just walking through, you must use the lit torch on the dark hole.
- Here you must navigate through the maze.
- The right path through can be found with the lit torch. Whenever you are in a new chamber, move the lit torch over all passages. There will be one where the flame will be bigger, because there's more fresh air coming in from somewhere, and that will also be your way out of that chamber. Keep repeating this pattern until the maze is cleared.
- Finally you will come to a chamber with a ladder to glory. Climb up the ladder to escape.
- Watch the cutscene.
 The game is finished!
THE GAME IS FINISHED. CONGRATULATIONS!!!