Escape Lala walkthrough
About this walkthrough
This is a complete walkthrough for Escape Lala.
Using this walkthrough will get you through the game with the least amount of time and wandering around, but may spoil the game and fun of exploring.
Items which can be picked up as inventory items and items which can be constructed by combining or using other items are written with bold text for emphasis.
- Pick up a coin (1) from the ground.
- Click on the small hole on the wall. Pick up a coin (2). Go back.
- Go west.
- Take sunstone from the pedestal.
- Take the gong stick from the gong.
- Use gong stick on the gong.
- Pick up a coin (3) from the pond.
- Go east, and then again east.
- Use sunstone on the sunstone-shaped hole.
- Click on the block that rises up.
- When the puzzle opens, click at the end of the path to pick up a coin (4), then take the torch through the path to light the fire.
- Click on the vines to pick up a coin (5).
- Go east.
- Climb down the ladder.
- Take the shield.
- Take the key.
- Take the spear.
- Take the red gem that is the ram's eye.
- Click on the panel at the left. Use the panel to make all buttons light up, to open the door.
- If you can't figure it out, first click the lower left button, then centre button, then upper right, then upper left, and finally lower right.
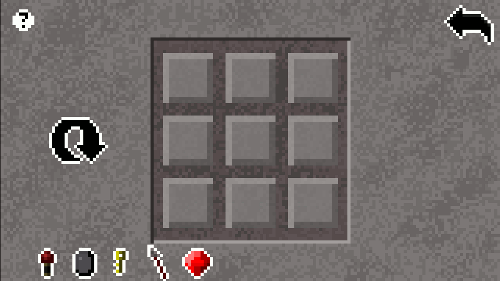 Keypad puzzle solution.
- Go west, and then again west.
- Click on the painting to pick up a coin (6).
- Go down to the well.
- Pick up a coin (7).
- Take the bucket.
- Go up.
- Return to the room with the pond and gong.
- Use shield on the broken gong.
- Use gong stick on the gong.
- Take the sword that rises from the pond.
- Use bucket on the pond to get a bucket of water.
- Go east, and then again east.
- Climb up the ladder.
- Click on the chest.
- Use sword to cut the ropes.
- Open the chest and check its contents.
- Pick up a coin (8).
- Take the violet gem.
- Take the rope.
- Climb down the ladder.
- Go east.
- Climb down the ladder.
- Go east.
- Use the bucket of water to extinguish the fire.
- Take fire flower fruit.
- Go west, and then again west, and one more time west.
- Click on the painting to pick up a coin (9).
- Go west, and then again west.
- Pick up a coin (10) that is under the red carpet.
- Use spear on the mousehole twice.
- Use fire flower fruit on the hole in the wall.
- Go west through the door that opens up.
- Click on all four piles of gold to pick up coins (11, 12, 13, 14).
- Take the handle that is on top of the largest pile of gold.
- Pull the skeleton arm.
- Take the blue gem.
- Go east, and then again east.
- Click on the lower right side of the bookshelf to pick up a coin (15).
- Study the left and right sides of the bookshelf, click on the two books which are not in identical positions.
 Non-identical books.
- After the bookshelf reveals a secret area, take the stone heart.
- Use spear on the nest.
- Take the yellow gem that falls down.
- Use spear on the nest again to pick up a coin (16).
- Go east.
- Click on the painting to pick up a coin (17).
- Use the handle on the well.
- Turn the handle to lower the chain.
- Go down to the well.
- Click on the big mushroom to pick up a coin (18).
- Go east.
- Take the green gem.
- Click on the crystals in the cave ceiling to pick up a coin (19).
- Go west.
- Use bucket on the pool to get a bucket of water.
- Dive into the pool.
- Act quickly and give stone heart to stone figure lying on the bottom. If you succeed, there will be a release of oxygen, if you fail, you will simply return to the cave and need to try again.
- Go east.
- Click on the half-buried vase to pick up a coin (20).
- Go east, and go up.
- Click on the lion head's eye, after it falls off, take the indigo gem.
- Return all the way back to the room with the well.
- Click on the painting to pick up a coin (21).
- Go east.
- Click on the dark mirror to switch the mirror reflections.
- Go west, and then again west, and one more time west.
- Click on the mousehole, and take the orange gem.
- Go east, and keep going east as far as you can.
- Put all the gems into the stone with seven holes. The order doesn't matter, they go into right places automatically (a wasted puzzle opportunity, if you think about it?).
- Go across the rainbow bridge that appears.
- Click on the stone that is on the ledge twice to pick up a coin (22).
- Take the plant.
- Go back across the rainbow bridge, and then west, and then again west.
- Climb up the ladder.
- Click on the flag in the boat to pick up a coin (23).
- Click on the head of the bird figure to pick up a coin (24).
- Click on the bird figure, use key on the keyhole.
- Go through the door on the side of the boat that opens up.
- Click on the hatch on top of the boat to pick up a coin (25).
- Use the bucket of water on the flower patch, pick up a coin (26) that grows on one of the flowers.
- Use plant on the flower patch to make a tree grow.
- Take the anchor.
- Go west, and then again west.
- Climb up the ladder.
- Use rope on anchor to get rope with anchor.
- Use rope with anchor as a grappling hook on cave opening.
- Click on the rope to climb out of the cave.
- Watch the ending which also shows your score.
 The game is finished!
THE GAME IS FINISHED. CONGRATULATIONS!!!