Stasis walkthrough
About this walkthrough
This is a complete walkthrough for Stasis.
Using this walkthrough will get you through the game, but may spoil the game and fun of exploring.
Items which can be picked up as inventory items and items which can be constructed by combining or using other items are written with bold text for emphasis.
Warning !
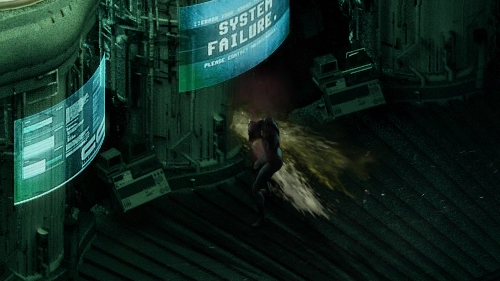
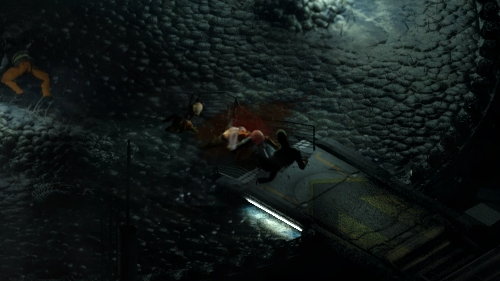
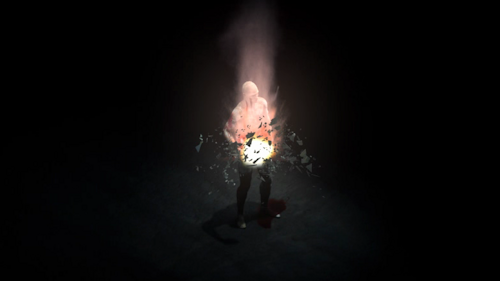
This walkthrough contains some screenshots with graphical violent content.
Cryochamber
After violently waking up from stasis, you can painfully walk around. Walk left to the locked door. After hearing an announcement about your medical condition, the door will be unlocked and the red light on the door will turn blue. The same colour codes will be used for all doors in the game. In the next room, just walk through it and exit to the right. In the product storage room, keep on walking and exit to the right, to a room filled with unused hospital equipment. Walk through and exit to the right, which will lead to infirmary.
Infirmary
Next you need activate DocMate scanner to check your medical condition. All infirmary equipment is powered off, so first you need to get some 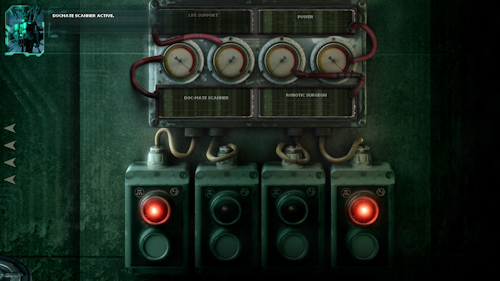 DocMate activated.electrical power. There is a breaker box right next to the door. Click on it to see the console. To provide power for the DocMate scanner, you need to push the far right and far left buttons. Once the scanner is activated, walk to the lower right of the room and enter the scanner. The scanning will happen automatically. Once the scanner has decided the proper treatment for you, there will be an emergency medical treatment drawer visible in the centre of the room. Click on it, and DocMate systems mixture and an empty hypodermic syringe will appear in the inventory. Use syringe on mixture to get a full hypodermic syringe. Use the syringe on yourself to be treated. Now you can walk normally and run by double-clicking.
After using the syringe you will see a drug-induced flashback.
When your mind returns to present time, go back to the breaker box. Push any inactive button to reset the breaker box. To activate robotic surgeon, push the rightmost button first and then the button next to it on the left. Walk to robotic surgeon terminal and use it. Choose access surgery prep. Any of the three choices which are not currently selected will extend the robotic surgeon arm. Walk back to the breaker box. Push any inactive button to reset it, and the robotic surgeon will be without power. Walk back to the robotic surgeon arm. Pick up high speed neural drill.
Maintenance area (P-Storage 1)
Exit infirmary and go back to the product storage room and continue left from there. Go through the empty corridor and exit left. You will come to a room with a heavy loader, and locked doors to maintenance area and freight elevator. Enter the room on the left that has blue indicator colour on the door. Find admin computer on the desk and use it. Reading the entries on the computer will provide useful information about the security situation, but the most important thing is to choose "Product storage security", and change the status of the Maintenance door from locked to unlocked.
There is an emergency glass box right next to a huge display that is providing public information about security lockdowns. Walk to the emergency glass box and break it. Glass shard will fall the floor, click on it to pick up a shard of glass. On the right side of the room is an entrance to toilets. Enter toilet room, and search the toilet bowls. There is a wet dirty towel in the bowl right next to the sinks, pick it up and exit toilets. Go back to the room with a heavy loader and go to the maintenance room which is now unlocked.
Walk up the ramp to the pressure release valve. Turn the valve three times to release the pressure in the fluid tanks that are located in the next room. Go through the door on the left. Use the high speed neural drill on the tanks to falsify a leak. This will reboot the security systems and the freight elevator door will be unlocked. Use elevator control. Access to product storage level 2 (P-Storage 2) is denied, so go to service lobby 1 (Serv.Lobby 1) or service lobby 2 (Serv.Lobby 2) instead. Both are accessible, to have the fastest way to solve the game go first to the service lobby 2, to have the puzzles in the more logical order, go to the service lobby 1 and explore everything there.
(This walkthrough continues to service platform 2, which is where you will go anyway, either straight or after examining service platform 1 first. If you choose to go to service platform 1 first, which might be recommended for purpose of exploring, hop over the service platform 2 part below, read only the first paragraph of the service platform 1, and then come back to the service platform 2 instructions.)
Service platform 2
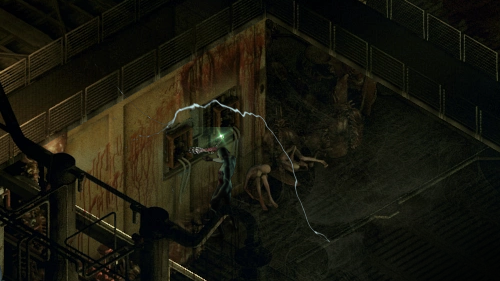
Step out of the elevator and go to the corridor. You will here a voice over a radio calling out for someone. Exit left and find a mutilated body that is still twitching. When you click on the body, your plug suit will get a radio connection to a woman, Te'ah Hensley, who was trying to call the dead man, Yuri Leonov, earlier. She is telling you to take a tram and opens a door to the right. Don't enter yet. Instead, use shard of glass on the dead body, you will get a severed hand that is needed on the service platform 1. Go back to the elevator and go to service lobby 1 (Serv.Lobby 1).
Service platform 1
You will exit from the elevator to a corridor with portals. Just go through the corridor and exit to the right. At the end of the corridor there are several body bags and a corpse of Clara Daniels. You can examine them all, but at least you need to open the rightmost body bag to find an electronic toe tag.
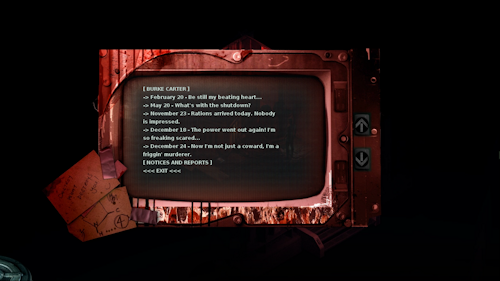
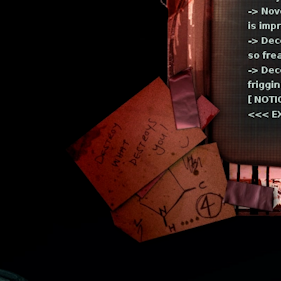
There is a biometric terminal on top of the screen. Use the severed hand on it to open the door to the morgue. Enter the morgue, and you will find discarded reports on autopsies on the table. You don't need to pick those up, but they will give a hint on what you are looking for in the room. See the door to the furnace in the top corner, it won't open without the electronic toe tag. Almost everything on the morgue is frozen, except for the furnace. You need to open the furnace and use the heat from there to melt the ice. The problem is that the furnace door will remain open only for a few seconds, so something is needed to keep it open. Use the wet dirty towel on the furnace. Next you need to be fast with your reactions. First, use the electronic toe tag on the furnace to open it. Right after that, run out of the room to escape the heat. If you are successful, you can return to the morgue to find all the ice gone. If you are not fast enough and die, you will be automatically returned to an automatic save game spot and you can retry it again.
When you have successfully melted the ice, return to the morgue and find all the cadavers opened and dead bodies lying on them. Examine the rightmost body to find a lodged crowbar going through its head, which apparently was the cause of death as indicated by the autopsy report. Pick up lodged crowbar.
Exit the morgue, go back to the elevator and go to service platform 2. Walk to the end of the corridor where you found the corpse of Yuri Leonov, and enter the room with a tram.
Service platform 2 (Rapid Transport System)
When you enter the door which says Rapid Transport System, you will be stopped for a while to have biological containment protocols completed. During that time you will have a radio conversation with Te'ah giving you some background information. After that, a door will open, walk forward to enter it.
In the next room there is a tram powered down in the middle, and a computer terminal on the upper level. You can also access the tram and tram controls, but since it has no power, you can't ride it yet. Go to the upper level where the computer terminal is located. Notice there are two closed breaker boxes on both sides of the computer terminal. If you look at the descriptions, the left one is "Tramline Breaker" and the right one is "Tram Charging System". You need to open the closed breaker boxes to control the power allocation. Use the crowbar to force the boxes open. Take the fuse from the left breaker box and insert it into the right breaker box. Note that you can't click the breaker box first to examine it and then insert the fuse, you need to insert the fuse in the main view. Use the computer terminal and choose "Recharge the tram".
Take the fuse from the right breaker box and re-insert it to the left breaker box where you found it from. Use the computer terminal again and choose "Switch tram line". Go into the tram, which is now called tram powered up, Te'ah has set the destination to the Medical Wing. Go to tram controls and push the green button with the text "Tram line switch". The tram starts moving and a cutscene follows.
Cloning vats
After Dr Malan has made the tram crash, jump down from the derailed tram. There is nylon emergency tape behind the tram, next to the door, pick it up. Go through the door which looks to be inaccessible because of the yellow tape, but can be accessed anyway. You will come to a small room with a toolbox lying in the middle. You can try to open the toolbox, but even with the crowbar and high speed neural drill it remains unopened, so enter the door on the left instead. You will enter a room with massive cloning vats, which contain some living mutants and dead human bodies. If you want to see the entire area, click on top, left of the bloody handprints when the pointer has the eye icon. There is no need to see the entire are for any puzzles, though.
The next thing that needs to be done is get rid of the mutants in the cloning vat to gain access to the other side. Use nylon emergency tape on the crowbar to construct a crowbar grappling hook. Use the crowbar grappling hook on the dead body in the middle of the cloning vat to reel it on the platform you are standing on. Pick up toolbox keys from the dead body. Go back to the previous room and use toolbox keys to open the toolbox. Pick up jumper cable from the open toolbox. Go back to the cloning vats.
There is an electricity pole and a generator on the right side. The goal is to have the mutants electrocuted to gain safe access to the other side. First, use the high speed neural drill on the electricity pole to get it detached from the floor. Next, use the crowbar (now in the form of crowbar grappling hook) on the electricity pole to make it fall into the cloning vat. You can also do this before you construct the crowbar grappling hook, in which case you simply use the crowbar after high speed neural drill. Lastly, you need to get some electricity into the cloning vat. Use the jumper cable on the generator, the other end will be on the floor, so click the exposed wires on the electricity pole to connect both ends of the jumper cable. Now, turn on the generator and watch the mutants get electrocuted.
Go across the cloning vat, and you will end up on the other side with three computer terminals and a crossbeam. You can read the computer terminal entries, but all that is needed to continue is to use the crowbar grappling hook on the crossbeam. Climb up on the crossbeam. Above you is a very long ladder casing, so simply climb up to the next area. You will come to an abandoned tram station with inoperative trams and graffitis on the wall. Keep on moving forward to the top right. Next room will be slightly different looking, but basically the same. Again, keep on moving forward to the top right. The next room is the last room on the tram station, exit to the right. In the next room, you will have a brief radio conversation with Te'ah, after which the door in the middle will open. Go through that door. The next room works in a similar fashion, you will have a radio conversation, while the locked door will unlock. Enter the door on the right after it has opened.
Security area / crew rooms
Now you are in a room which has access to security area and crew room. After Te'ah has explained how to search for your family using DNA, you are free to explore this area. Go right, to the crew area through a door which has the text "Crew Commons" above it. You will be in a gloomy corridor, with some writing on the wall and a dead body which keeps a door in the middle open. The other door to the right is locked, as indicated by the red light. Enter the middle door.
The room you entered is a laboratory with an iron lung in the middle. There is a DNA scanner on the right side of the room. Use the empty hypodermic syringe on yourself to get a blood sample, which will appear as full hypodermic syringe in the inventory. Use the full hypodermic syringe on the DNA scanner. After using the DNA scanner, something weird happens behind the frosted glass window, which is a bit to left from the DNA scanner. The frosted glass window which didn't have the hand action icon before when pointing it, now has the hand icon. Touch the glass to see what happens.
Whatever just happened in that room caused that door to become locked, but after a radio conversation with Te'ah, you can access the door on the right which was previously locked. After going through to the right, you will be in a central plaza of some kind, where there is a non-operational elevator in the middle. The plaza also has access to the entertainment block, which is currently locked as indicated by the red light, a tram station which is also locked and sleep blocks and mess hall to the lower right which can be accessed. There is a security panel next to the tram station door which can be used to open the door, but the suspicious looking gas which is flowing under the door might indicate that it's not the best course of action at this stage. As the lower right is the only way that can be accessed now, go through that door.
In the corridor there are two doors, in the middle of the corridor and at the end of it. Both doors are unlocked, as both have blue lights. Enter the door at the end of the corridor. The door leads to a dormitory with sleeping cots out of their usual places and few dead bodies lying around. At the end of sleeping cots there are bed lockers. Examine the bed locker of the unoccupied sleeping cot and pick up linen bed sheet. Exit the room, and go back to the other door on the same corridor. When you enter that room, there is a torn-up floor grating in the middle of the room. That will be an access to the otherwise closed areas of the ship. Use linen bed sheet with the torn-up floor grating to have a way to climb down. Once you have done that, enter through the grating.
Sewers
When you climb down, the bed sheet comes loose and you fall to a sewer of some kind. You are still alive, but there is no way to go back the way you came, so you must find another way out. You can go either left or right in the sewer, both ends need to be visited. For optimised, shortest solution, go first left. Walking in the sewer is a bit slow, as the resistive force of the water prevents running. When you come to the next screen, there are dead bodies and a fallen grating that leads upwards. Climb up the grating and you will come to the entertainment block that had a locked door earlier. You can't use the door from this side either, but you can access the entertainment facilities.
There are a few things to do and pick up in this room. First, go to the lower left of the screen to find a pool table and pool cue. Pick up pool cue. In the centre of the room is a holographic emitter, use the high speed neural drill on it to pick it up and the dancing hologram disappears with it. Next, go to the cigarette vending machine that is in front of the television screens. The machine doesn't work, but use the pool cue to smash it open. Pick up Cayne Corporation lighter from the broken cigarette vending machine. Exit the entertainment block and go two screens back to the place where you first entered the sewers.
This time keep going right in the sewers. The room you come to, has a huge drainage pipe in the middle and a ladder that leads to pipe access which is where you should go next. Before climbing up the ladder, notice a pump station diagram with some red lights on the wall. After  Pump station diagram.studying the diagram, proceed up the ladder and into the pipe access. When walking further in the corridor, dark areas will be lit, and a cat appears. You try to call for the cat, but that doesn't go quite the way you planned. Since the corridor is not accessible further in the same direction, take the left side corridor and keep walking forward. Now you are in the same screen where you were before, but on an overhead access corridor above the sewer. The only thing you need to do here is keep on walking to the left.
Now you come to a room which is full of sewage, has a leaking methane tank, an elevator access shaft and a pump station terminal computer on the walkway above the sewage. Use the pump station terminal and you will see graphics which allow you to set valves to either raise or lower the sewage level. There are a total of six valves and each of them have two possible positions. If you studied the pump station diagram earlier, you noticed that the lights were lit for the raised level and under the lights there were graphical presentations painted on the wall indicating correct valve settings. On the bottom half of the diagram, which also has red lights and connecting lines that are not lit, are settings for the lowered level. Unfortunately the painted symbols for the last three valve positions have eroded and are no longer visible, but at least there are first three still visible, which greatly reduces the need for trial and error.
So using the pump station terminal, change the valve settings for the first three valves to those indicated by the wall graphics: down, up, up. For the last three you need to just first put them to some random settings, and then push the lower sewage level button on the console to see if they work. If they don't work, change something and try again. If you can't find the correct settings yourself, the complete correct valve settings are: down, up, up, left, right, left. If you do this correctly, you will see how the sewage gets drained out into the large drainage hole.
 The correct pump station settings.
Now you can use the ladder on the right to climb down and go to the leaking methane tank, which is labeled as pipe grip. Use Cayne Corporation lighter on the pipe grip. Go back to the ladder and climb up to the walkway. Walk to the end of the walkway to the point which says broken-off balustrade. Now you need to clear the way to the elevator shaft. Use the pool cue on the pipe grip holding lighter below. You must do this from the walkway above it, if you try to cause the explosion standing next to the tank, you will die in the explosion. After the explosion your ears will be ringing and hearing will take a while to return, but you can now see the exposed elevator shaft ladder below. Use the ladder again to climb down and enter the exposed elevator shaft ladder to exit this room.
Security area / tram station
The ladder will lead to the central plaza you saw earlier. Go through the door on the left and keep going left in the next corridor as well and you will come to the room which has access to the security office. Enter the door which has the text "Security Office" above it. There is a door on the right side of the room and a motion detector above it. The motion detector gets activated if you go to the computer terminal on the left side of the room and choose "Atmosphere control access" and "Activate motion detector". Once the motion detector is activated, it will be visible for a short while above the door, but not long enough for you to run to it. You will need to fool the motion somehow. Take the holographic emitter from the inventory and use it on the motion detector above the door. After doing this, go to the computer terminal to activate the motion detector. The door should be opened after the motion detection scan is complete.
It is not necessary, but you can check the security cameras to see the tram station still flooded with deadly gas. Enter the atmospheric control area that is now accessible in the same room. Use the atmospheric control access terminal, choose "Venting procedures" and "Vent atmosphere in tram corridor B". You can confirm that the venting was successful by looking at the security cameras again, but that is not required. Exit the security office, and go back the way you came, exit right and go through the next room still exiting right. You are now back in the central plaza.
Use the security panel in front of the tram station B door. Choose "Door locked due to atmosphere" and then "Override lock and open door?". If you did the atmospheric venting in the security area, the door can now be safely opened. Enter through the open door. Te'ah will inform you that she has found out your daughter's location which is the Medical Bay. There are two doors in the corridor, walk first to the right. It is a tram station, but the tram is destroyed with no way to fix it. There has to be some other way out.
There are three specimen transport containers on the left side of the room. Examine these to find out that they are all coded to reach some destination aboard the ship. The code you need is the rightmost of the three, the one with the transport code to the Medical Bay. Exit this room, and go through the door that is located right next to the door of this room in the middle of the screen. This room has the line for specimen transport, which will be your way out of here.
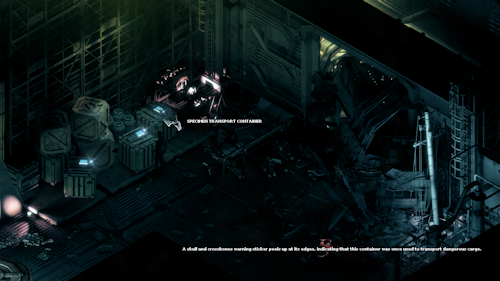 The location of the correct specimen transport container.
In front of the specimen transport is a switchboard that is used to choose a destination. When you click on the switchboard, it is in a reset state, where all three selectors which are shown in red colour have a shape that vaguely resembles the letter "U". There are buttons above these indicators, you can push upper or lower buttons to cycle through the shapes. There are altogether eight different shapes, and each selector has the same shapes in the same order. If you haven't changed any selectors, the first one is automatically correct. If you have changed them previously, change the first one back to the U-like shape that was there when you first used the switchboard. The second one should be a shape with a vertical line in the middle that looks a bit like the letter "I". It is also found if you first cycle down through all the shapes, and when you can cycle downwards, push once the upper cycle button. The third and last one is the most challenging to describe, but it has vertical lines which don't reach all the way to the top or the bottom, there is only one shape like that, all the other shapes that have vertical lines touch either the top or the bottom. The easiest way to find it though is to cycle through the shapes using the upper button, the one that is needed will be the last one in the order.
 The specimen transport container. The specimen transport container. |
The specimen transport container. |
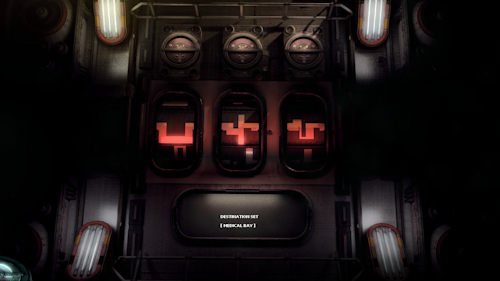 The correct settings for the switchboard. The correct settings for the switchboard. |
The correct settings for the switchboard. |
When the destination is correctly set, the text "No destination set" on the console will be changed to "Destination set [Medical Bay]". When you exit the switchboard view, the transport will open up and can now be boarded. As there is nothing more that needs to be completed in this area, board the specimen transport.
Medical wing
You come to the medical area safely and exit the specimen transport. After a short conversation with Te'ah a door on the right opens that you can use to move to the next room. More conversation will follow, and after that you are free to explore. Do pay attention to the turrets that rise from the floor and go back down again. These can get you killed, if you make any wrong moves, but you will be returned to a moment before the conversation by the autosave feature should that happen.
Notice the Jukka Cola vending machine in the middle of the room. You should carefully go to the vending machine, without activating the turrets. Use Jukka Cola vending machine four times. The first time you will get a can of Jukka Cola which will go to the inventory. The second time you will go to the back of the machine and slightly push it forward. The third time pushes a bit more. The fourth and last time you will push it and tilt it over activating the turrets which will start shooting the vending machine and each other. The turret on the left will be destroyed and an exposed duct will be on its place, while the turret on the right will remain still active. If you try to cross the floor, you will still get killed. Pick up a hanging wire that was connected to the vending machine before and is now visible against the wall, it will become loose cables in the inventory.
Enter the exposed duct to take care of the other turret. This area is a ventilation duct that also has sentry gun bases for the turrets. You can only crawl in this area, as can be expected of the ventilation duct. You can simply crawl forward not paying any attention to the sentry gun base on the left, as the turret has already been destroyed. You can check the sentry gun computer control to see the status of the turrets, but it is not needed. Simply go to the sentry gun computer control, take the Jukka Cola can from the inventory and pour some cola on the computer. The computer display will show a malfunction, so the remaining turret is now harmless.
Crawl back from the computer, but in the fourway junction go to lower right and pick up an empty pistol that is lying there. Crawl back to the place where you entered on the left and exit this area to return to the turret room. Try to access the glass door on the right, but it is locked. Te'ah informs you that she can't open it, so you will have to think of another way to get it open. The destroyed sentry gun that was lying on the floor before is now an interactable object labeled as disconnected sentry gun. Pick it up and you will shoot your way out, by destroying the glass. Enter the door to the right.
The next room has an elevator in the middle, but it can't be used to go down. There are also doors leading to the directions of right and lower left. First, this room requires some minor pixelhunting. What needs to be picked up is blood and tissue, which is all that remains from the crew who was here. It is not clearly visible, but can be found by looking for a green PDA light and massive bloodstains on the floor. Blood and tissue are spread on the wall, right from the PDA and up from the bloodstains. Once you have picked blood and tissue, go through the door on the right.
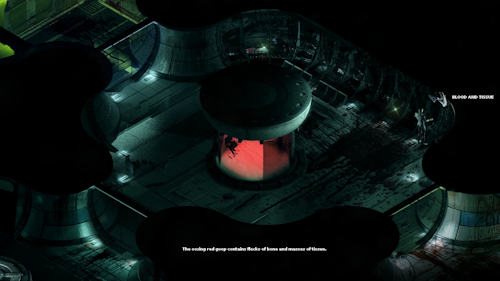 The hotspot for blood and tissue.
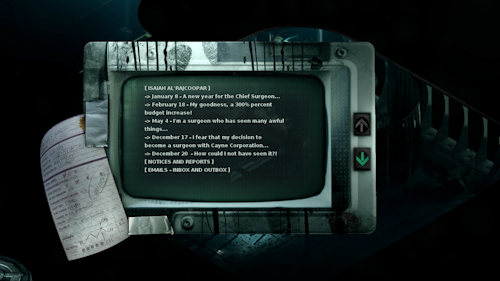
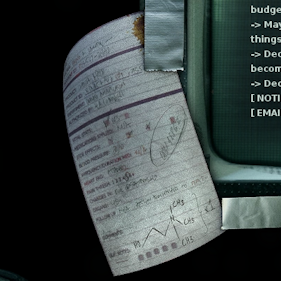
In this room there is blood all over the place. There is a doorway in the middle, but it is blocked by a forcefield. Search bloodstained environmental suits right next to it to find and pick up an oxygen cylinder. Go through the door on the right to enter the surgery room. When you walk further into the surgery room a conversation with Te'ah will tell you that surgically removing your PDT is the only way to proceed. There is an extracted PDT and a PDA on a surgical tray that is located between medical machinery and colourful tanks, pick the PDT up. It is also a good idea to read the PDA, not so much for the entries recorded, but to see a paper note that is attached to it. There are four tanks which are colour-coded as red, blue, green, and purple. Pick up an empty stasis fluid container that is in front of the green cryopreservation tank.
There is much more to do in this room, but for now, exit to the left where you came from and walk through the next room to return to the room with the elevator. In the elevator room, go through the door on the bottom left that leads to reception. On the office desk in the reception is a Medical Bay terminal, if you want to, you can try to use it, but it will correctly identify you as John Maracheck, with no security clearance. Pick up the extracted PDT from the inventory and use it with the Medical Bay terminal. Next use the terminal to see that you are indentified as Elizabeth Swanson, and the security clearance of this PDT allows controlling the forcefield. So what needs to be done is to click "Forcefield off" which will allow you to enter the room that was previously inaccessible.
Exit reception to the elevator room, and go through the door on the right to get back to the room where the forcefield was earlier. Enter the opened door in the middle of the screen to enter a stasis chamber. When you walk in, you see another survivor in one of the stasis pods and have a brief conversation with Te'ah. Notice the torn apart door with glowing red light at the back of the room. Go there, enter through the door to the storage room. There is a grotesque sight where a human has been split into three parts, human torso, instestines, and legs. You can interact with the legs to read the PDA. It is not required to read the PDA, but like before you should notice the paper that has been attached to the PDA. In front of storage crates is a stasis pod chip on the floor, pick it up. Exit and return to the stasis chamber.
There are four stasis pods in this room. Two on the left side, one on the right side next to the broken stasis control terminal, and one on the right side at the far end of the room. All of these are easy to find, as they all have white bright lights, except for the one that is next to the control terminal and has a human inside of it. Now you need to examine the stasis pods. It doesn't matter which order you follow, but you can start from the empty stasis pod on the left side, as it is the closest to the storage room door, and then work your way around counterclockwise. That order would take you next to the discarded stasis pod also on the left side, and then to the other empty stasis pod on the right. You can't interact with the stasis pod that has a human inside of it.
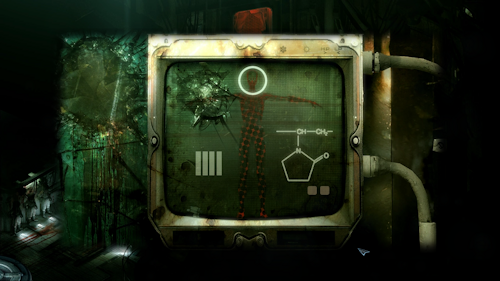
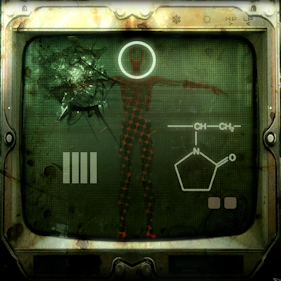
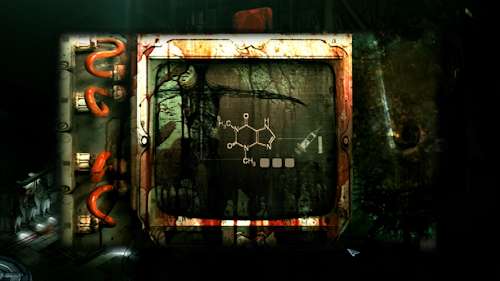
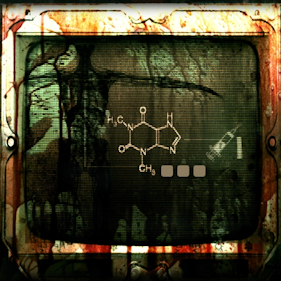
What you are looking for here are the clues to create a chemical mixture that will revive the survivor who is in stasis. Each stasis pod has a computer display, that is showing a chemical formula. These formulas have also one to five dots as a graphical cue to help identifying them. In addition, there is a syringe symbol with one to four bars next to it indicating the proper dosage. There are also graphical presentations of body parts to show which part of the body the formula needs to be applied to. If you read the two PDAs earlier and studied the attached notes, you will find that they had similar markings of chemical formulas. Combining all this information will help you to operate the stasis reviving properly.
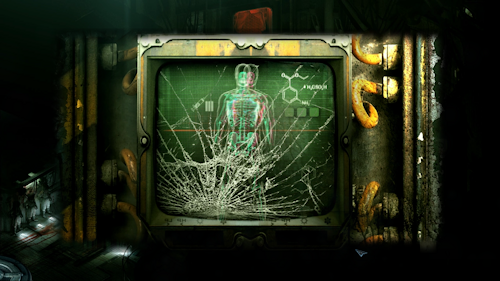
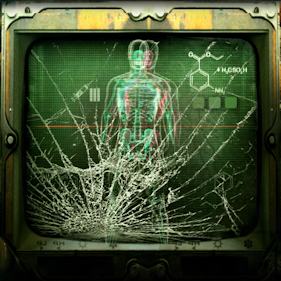
Go to the broken stasis control terminal and use the stasis pod chip on it. The computer will come to life and you can operate it. What you see on it is a presentation of a human body, divided into six segments. Each of these has buttons on the left and righ side of the image of a human. The buttons on the left side set the dosage, while the buttons on the ride side choose the chemical formula. You have clues for five segments, three from the stasis pods and two from the PDAs. If you don't remember them or didn't take notes, go back and review them. Try to enter all the data you have gathered from the stasis pods and PDAs correctly. As there were only five clues, but there are six segments, you need to guess the last one. In theory, you could guess them all, but that would be extremely difficult considering how many possible combinations there are. Taking full advantage of the clues will greatly reduce the random guessing, as you only need to get few missing things right. Below the six selectors is a button that you need to push when everything is correct.
| Screenshot of the clue. | Close-up of the clue. |
 A clue. A clue. |
 Close-up of the clue. Close-up of the clue. |
 A clue. A clue. |
 Close-up of the clue. Close-up of the clue. |
 A clue. A clue. |
 Close-up of the clue. Close-up of the clue. |
 A clue. A clue. |
 Close-up of the clue. Close-up of the clue. |
 A clue. A clue. |
 Close-up of the clue. Close-up of the clue. |
When you get everything correct and push the button a short non-interactive sequence will follow to show what happens. In case you can't interpret the clues, or despite your best efforts nothing seems to happen, here are the correct combinations - numbers indicate the dosage and number of dots for the chemical formula:
| 4 | 2 |  Correct settings. Correct settings. |
| 1 | 3 | |
| 1 | 5 | |
| 3 | 3 | |
| 2 | 2 | |
| 4 | 4 |
When the fate of the other survivor is known, you can again interact with the environment. Now there is cryopreservation liquid on the floor, take the empty stasis fluid container and use it on cryopreservation liquid to get some of it. With a full stasis fluid container in the inventory, exit the stasis chamber using the door on the left and in the next room go to the right to return to the surgery room where you were earlier. You have everything that is needed for the operation, you only need to make some preparations.
First, take the body part from the inventory and put it on the surgical tray where you took the PDT from earlier. Use the empty pistol which is also in the inventory on surgical tray to get refined organic material. Put this refined organic material into the organic receptical in front of the red tank. Notice how a green indicator light will lit up on the tank to show it is properly set. Next take the loose cables from the inventory and use them on the oxygen cylinder which is also in the inventory. Now you have an oxygen cylinder wrapped with cables, so use it on the blue oxygen storage tank. Use the full stasis fluid container with the green cryopreservation tank. Click on the purple anesthetic storage to activate it too. Now all lights are green, the surgical pod is ready and it's time for an operation.
When you click on the surgical pod a short conversation follows after which the operation begins. After the surgical pod has made some preparations, you need to operate the console to complete the surgery. The first part is very straightforward. In front of you is a monitor which has seven buttons for different stages of the operation. You simply need to push the one that has the red colour showing, then the surgical pod performs an action, and a different button will have the red colour, and you need to push that, and so on. At this stage you can't even push any wrong buttons. In case you want to know know which button does what before trying, here are the actions: the first button opens up the back of your plug suit with a laser beam, the next button under it moves two robotic arms onto your back, the third one makes the robotic arms pull the plug suit to the side, the fourth one will again be a laser beam this time making a painful incision on your flesh, the fifth one makes some needles briefly appear, the sixth one is again robotic arms this time pulling your flesh to the side exposing your spinal cord, and the seventh and last one will make a cut that will expose the PDT in the spinal cord.
The next thing you need to do is to operate the surgical equipment so that it will remove the PDT. The image on the monitor in front of you has changed to show some kind of neural connections of the PDT. There are seven nodes which need to be pushed in the right order to successfully remove the PDT. Doing this in an incorrect order will have you killed during the operation, but if that happens, you have an option to go to main menu or continue in the middle of the operation. You can try to do this as trial and error, but if you look at the green display right above your head, you can see it flashing the correct order. To make this more difficult, once you push the first button, the display goes black or shows some flickering every now and then, so the right image is flashing only for a couple of seconds at the time. To make this even more difficult, there is a time limit indicated by a beeping sound of the heartrate monitor. You have only few seconds between each button, the beeping that you hear will first become more fast-paced to indicate urgency, and if you don't do anything, you will die just like you will die pushing a wrong button. So the operation is both time-limited as well as has to be completely error-free.
If you can't get the correct order yourself, here are the instructions. First, you need push the topmost button. Next, push the lowest button. The third button in the correct order is the middle button that has three buttons above and also below it. The last two can be seen as pairs. The fourth and fifth buttons are the two buttons below the topmost one, and the one on the left is fourth and one on the right is fifth. The last two are the ones which are between the middle button and bottom button, so simply move towards the top from the bottom first pushing the second from the bottom and lastly the one right above it. Now the surgical sequence is complete, and a short scene will follow showing what happens while you are recovering.
| The surgery hints above your head. | Close-up of the hint. |
 Surgery scene with hints above the head. Surgery scene with hints above the head. |
 Close-up of the hint. Close-up of the hint. |
Exit the surgery room the left, and keep going through the next room exiting to the left again to come back to the elevator room. The elevator is now operational as indicated by the rotating arrow pointer. Use the elevator to go to lower decks.
Hydroponics
The elevator is going to lower decks, but is stopped as there is some kind of plant growth all over. You can access hydroponics, and you will have a short conversation with Te'ah about what needs to be done. First you need to explore this area. When you step out of the elevator, there are three doorways, to the left, to the right, and one a bit right from the elevator under the set of fans. Enter the one under the fans to get into a room that has a weird mutant insect.
First use computer terminal that is located on the table. Choose "[Hydroponics - Queen chamber]" and "Activate suction pumps". This will milk the queen insect and a bottle will appear on the milk collection pad. Pick it up to get queens milk. If you have read any log entries found in hydroponics, you may have seen that the queen insect is a temperamental creature. The next thing that needs to be done can be dangerous and deadly, if not done correctly. When you move the pointer over the queen insect, you will see that it can be interacted with. Careless interacting will lead to the queen insect eating you. But go right next to the queen insect, and watch its pincer. Every now and then the queen insect will extend its pincer. Also observe what happens over its head. When you see a big red smiley appearing, you know that the queen insect is in a good mood, and you can safely interact at that moment. When you do that, you will rip off the pincer that is extended, and it will appear in the inventory as queens pincer.
 Queen insect and a smiley.
Now notice the glowing bright yellow spot a bit left from the computer terminal. That is hardened amber, and you can use the queens pincer on it to get some pierced amber to appear. Pick up pierced amber to get some tree sap in the inventory. Now you can exit this room and go back to the previous one. Enter the door on the left. First, you need to a bit of pixelhunting again to find a metal plaque. There are two computer terminals in this room. See where the leftmost computer terminal is, and then look a bit left and a bit up from that terminal. There is a metal plaque lying against the wall, partially behind the plants. Pick the metal plaque up. Now notice how there is a vaporizer pad a bit right from the rightmost computer terminal. There is a cracked glass right behind it. Use tree sap on the metal plaque to get a metal plaque with sap, and then attach the metal plaque with sap on the cracked glass to make it airtight.
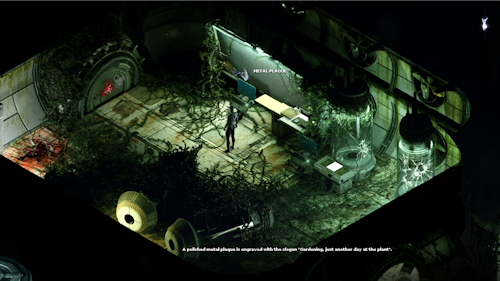 The hotspot for metal plaque.
Next put the queens milk on the vaporizer pad. Use the rightmost computer terminal that is next to it, and choose "Activate vaporizer". The machine will hum for a second, and then you will automatically pick up vaporized queen pheromone from the vaporizer pad. Exit to the right, and keep on moving through the doorway to the right. This is a room that has three oxygen collection tanks, an insect swarm and some fans on the wall. If you try to go through the insect swarm, the insects will kill you, so the first thing that needs to be done is to get rid of the insects. Take the vaporized queen pheromone from the inventory and throw it into the fast spinning fan. The insects will follow the pheromone scent and be killed by the fan. Now you can safely go forward. Open all three oxygen collection tanks that are easy to find with the white bright lights, which will release oxygen and create a fire hazard. Keep on going to the right.
This is another room in the area that creates oxygen, there is a body engulfed in vines on the floor. Search the body to get an emergency flare. Keep on going to the right and into the next room. In this room a woman, Elanore Way, is still barely alive but being engulfed by the vegetation. If you talk to her she will tell you that she wants to die. You can't and won't kill her, but you can give her the emergency flare that she can use to commit suicide and at the same time burn the vegetation from this area. After you give her the emergency flare, a short cutscene will follow.
You will run to the vaporizer room, see a huge fire burning down everything on this level, and have another conversation with Te'ah. When you are able to move out of the room, go to the right and use the elevator, as it is the only place where you can go anymore.
Laboratories
When you exit the elevator another brief conversation with Te'ah will follow. When it ends, find a toolbox on the right side of the room in front of the work light. When you open the toolbox you get a high temperature slug gun. Now you can go through the door to the left, but keep in mind that it will be one of the most dangerous areas on the ship. There is a patrolling security robot that will shoot you if it detects you. You can safely move when you are in the accessways to the birthing laboratory or mutagen laboratory. You can also go across from either one to the other, as long as the robot is further away. Any other areas can't be accessed for the time being, so the first thing to do is to get rid of the robot.
First, go to the birthing laboratory where you will see a shocking scene of three women who have been forced to carry some kind of mutant children. In the rightmost corner of the room, is a portable defibrillator next to the bloated fetus, go there and pick up the portable defibrillator. Interact with the leftmost pregnant woman to get bandage. Go back to the accessway where you came from and see the sink. As long as you stay in the line with the storage crates, you are in a safe spot. Use bandage with the sink and then use the sink to have the water running and flowing over. There will be spilled water on the floor. Now take the portable defibrillator from the inventory. When the patrolling robot comes to a place where it changes direction and is standing on the spilled water, use the portable defibrillator on the spilled water to fry out its circuits. This may be a bit challenging, as part of the spilled water hotspot will be blocked by the robot, but at least there will be some water still visible near to the sink. Now the robot won't be a problem anymore, and you can safely access all areas.
Go to the deactivated sentry robot and tear off some twisted metal that you can use for other purposes. After that you can enter the mutagen laboratory. In the mutagen laboratory there are two human skeletons at the far end of the room, and a liquid nitrogen canister in between them. Pick up the liquid nitrogen canister. When you have it, exit and turn left and go to the elevator platform and use platform to go to the upper level. On the upper level there is an airlock with a red light indicating that it can't be opened right now. Take the liquid nitrogen canister from the inventory and place it against the airlock. Then use the high temperature slug gun on the airlock to blast it open. When you have done this, go through the door.
You are in what looks like a madman's laboratory, but you need to pick up one item from here. It may be hard to see, so you may need to do some pixelhunting here. Notice there are hybrids lying on beds all over the room. There is one bed on the left side, where there actually is no hybrid, but an emaciated, starving organism. At the end of the bed there is bone mending glue that you should pick up. There is a doorway leading to the left, it is possible to go there, but you can't do anything else than read PDAs there yet, so you can exit to the platform where the elevator was located. Before leaving, it is not required, but highly advisable, to use the terminal in this room and read through the log entries about birth reports. That may change the way you interpret some events that will follow.
 The hotspot for bone mending glue.
When you have done whatever you choose to do, use the elevator platform to go the lower level again and go back to the mutagen laboratory on the right. See the power cell that is in the floor with a blue power symbol. First, use the bone mending glue on the power cell to get power cell housing lock imprint. Next, use the twisted metal with the power cell housing lock imprint to construct a power cell housing key. Using this power cell housing key on the power cell in the floor, the power cell will rise up revealing an open power cell housing from which you can pick up a power cell. Exit the mutagen laboratory and enter the door on the right where you first entered this area.
Notice the closed power cell housing at the far left. Take the power cell housing key from the inventory and repeat the same steps as before to get another power cell. When you have it, exit this room and go back to the birthing laboratory on the opposite side from the mutagen laboratory. There is one more power cell in the middle of the three pregnant women. Repeat the same steps as before to remove the power cell and put the women out of their misery. Exit this room, go back to the elevator platform and use the elevator to go on the upper level. Enter through the door in front of you, then enter the door on the left.
You enter a room with a strapped down creature in the middle, and a glass wall on the right that can't be opened. There are three open power cell housings under the creature, so what needs to be done here is to place the three power cell from the inventory into the open power cell housings. When you have done this, notice the surgical laser next to the strapped down creature. Use the surgical laser to break the glass wall, the first time it doesn't go too well, so use it another time right after. It is getting closer, so use it twice more, altogether four times, to break the glass wall. When it is broken, you access through it to enter new areas.
There is nothing to do in the next room, just pass through and exit to the right. Now you come to a crossroad, where there are four ways to go. One where you are coming from, a locked door in the middle, an entrance blocked by a forcefield on the right, and one more door on the lower left.
Go through the door on the lower left. There is only one thing that needs to be done here, go past a certain point to trigger an event that will enable the story to continue. If you examine items in the room, they are all labeled dead hybrid in cage. Notice at the far left of the room there is one empty cage on top of two other cages. Go there and walk in front of the cage that has a yellowish glow inside of it. If you find the correct spot, the dead hybrid inside will move a bit, but nothing else will happen. You have now triggered the event and can exit this room.
 The right spot to trigger the event.
Go to the locked door on the opposite side. When you will get a closer view, click on the interactable portals to view what is located inside. After seeing the shocking scene, exit the view. However, when you do that, the entire area is starting get flooded with some kind of gas, and you will lose consciousness.
Finale
There will be a cutscene showing Dr Malan taking you some place. After some conversations, you will be in a room with a huge viewing glass that is labeled Rebecca Maracheck when trying to investigate or interact with it. Try to break the glass three times. No matter what you do here, you can't prevent what is going to happen - your daughter will be killed in front of your eyes. After that happens, the same hotspot will be labeled as blood stained glass. Interact with the blood stained glass three times to break it. Pick up the teddy bear that is covered with blood. There is a table on the left that has John's PDT on it, go there and pick it up.
Te'ah tells you that you must move on and put your daughter's blood into the DNA scanner to find your wife. The scanner is on the same table as John's PDT, so take the blood-covered teddy bear from the inventory and use it with the DNA scanner. After the scan, a recycling drain will appear as an interactable spot a bit right from the DNA scanner. Click on the recycling drain to exit the room. You will fall through the drain and end up in an area full of dangerous acid.
You are hanging from a ledge, so first drop down to the walkway. When you have jumped, Te'ah informs you that your wife is in the Military wing. In the middle of the screen is a dead body in hazmat suit, go there and interact with and a glove will appear on the floor right in front of the body. Pick up the glove and walk to the far right of the room. Notice there is a stream of acid falling from the second foor to the acid pool and a melted balustrade next to it. Take the hazmat glove from the inventory and collect some acid from the stream and now you will have a hazmat glove filled with acid. Notice the metal grating on the wall, that will lead to other rooms. In order to use the metal grating as an access you need to use the hazmat glove filled with acid on the metal grating. The metal grating will melt allowing you to go through, but the glove stays in your inventory and is now called melted hazmat glove. Enter through the opening.
You are in a shaft of some kind, climb up to proceed further. Where you end up is a grotesque room with blood and corpses all over. There is a door, but it is locked. Go to the topmost corner of the room. There is a prosthetic arm between two corpses, and it can be easily found by looking for the green light that is coming from it. Pick up the prosthetic arm and then move to the opposite end of the room on the lower left. There is a malfunctioning power distribution box on the wall. Fixing it will enable the door to work. Use the prosthetic limb in the inventory with the melted hazmat glove to construct a prosthetic limb wrapped in rubber, and then use it with the power distribution box.
Now the door is moving, but is still not allowing you to pass as it won't stay open. Start moving towards the door, but soon a hybrid will fall from above. Interact with the hybrid, first you will kick it for Rebecca. After that you can search the fallen hybrid to get hybrid intestines. Go to the door, and see that there are exposed cogs to the right of the door. Take the hybrid intestines and jam the cogs with them. Enter through the door to the janitorial office. A brief radio conversation will follow.
There is a terminal on the left side of the room, go there and use it, choose "[Maintenance bay pod control]" and then "Maintenance bay pod open". The maintenance pod is now accessible, so use it to exit this room. You can choose Disposal area or Visitors center expansion as your destination, both need to be visited, but first it's better to visit the disposal area. You end up in a place with weird kind of organic growth all over. Walk across the room to the right to enter a further area of the same hive.
Notice the heavy loader at the far left which was sealed in during the construction. Go to it, and pick up a plasma cutter that is attached to it. After the plasma cutter is in the inventory, you will see the loader distribution box. Interact with the loader distribution box to pick up a power cell. Exit this room to the left, and enter the maintenance pod. Set the destination to the janitorial office where you came from.
In the janitorial office there is a power pad in the middle of the room. Use plasma cutter you previously picked up on the refridgerator on the right side of the room, and you will automatically walk on the power pad and cut the refridgerator open. A frozen body falls out of the refridgerator and you can pick up an eyeball from the frozen body. Use the maintenace pod again, this time setting the destination to the visitors center expansion area.
You will enter a room where there is a powered down loader in the middle of the room. On the powered down loader is a loose panel, click on it to examine it. Behind the panel is a retinal scanner, so take the eyeball that you picked up in the janitorial office and use it on the retinal scanner. Now you can access the power cell housing, so take the power cell from the inventory and use it with the loose panel. This will turn the powered down loader into powered up loader and you can interact with it to set it free. The loader will crash though a wall providing you an access to the Groomlake visitor center.
In the visitor center you will find information kiosks and a Groomlake model that you can interact with to get more information about Cayne Corporation. None of that is required, but it will give some background information about the gameworld, if that interests you. Either after exploring this room or immediately after entering, depending on your choice, exit to the left to proceed further. In the next room is an enourmous statue in the middle and more information kiosks. Like before, you can choose to explore this room or just move on, in either case you need to go to the left.
You enter a lifeboat station with a row of destroyed lifeboats. You can't use any of them, so keep on moving to the left. There are only more unusable lifeboats here, so go through the door in the top middle to proceed further into the complex. There are some interesting decorations in this room which look nothing like the rest of the Groomlake, but nothing that can be interacted with. When you have admired the view, go through the airlock door on the right.
In this shuttle bay you will have the final confrontation with the antagonist. When you enter you will see Dr Malan holding Te'ah as a hostage. He will soon throw her to the floor and after the conversation ends, you can do your move. Since Malan is armed and wants to end all this, you will have only a moment to act here. If you die, you will be brought back from the autosave to the moment before the conversations. Notice that during the antagonist confrontation you don't have a chance to manually save the game. To take care of Malan, you need a weapon. The only thing you have is the plasma cutter that you still carry in the inventory. Trying to use it on Malan won't be successful. Instead, see the machine parts to the right of you. Use the plasma cutter on these. The following havoc will cause Dr Malan to fall through the opening on the floor, but you will also get seriously injured.
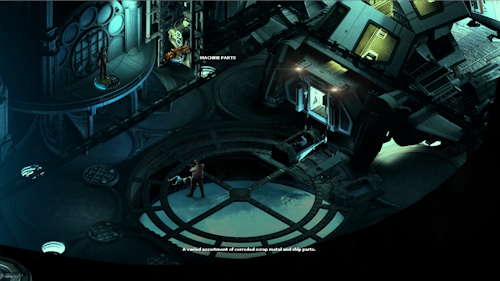 The hotspot for machine parts.
Now you will talk with Te'ah, and a revelation follows, she is not on your side after all. You must stop her from using your wife's stasis pod for her own purposes. See the quantum storage device that is in the middle of the floor. You can move only by crawling slowly, but go the to quantum storage device and pick it up. Now you will have John's personal data tag in the inventory. Te'ah is walking back and forth preparing to leave. Notice there are gun turrets around, ready to shoot when they have a target. Throw the PDT at Te'ah, and the gun turrets will shred her to pieces. After Te'ah is dead, you can again save and load games if you want to.
All that remains is to have your wife safely leaving the ship and saying your goodbyes to her. Walk to Ellen Maracheck who is in the stasis pod about to be loaded into the shuttle and interact with her. The destination of the shuttle will be changed, Ellen will be loaded aboard and the shuttle will depart. For the very final plot twist, watch the final cutscene to the very end of it.
 The end.
There is no more gameplay, but what remains is for you to interpret what really happened in the story. Whether you read all log entries during the game or not may influence your interpretation of the events and the final resolution of the story.
THE GAME IS FINISHED. CONGRATULATIONS!!!
Deaths and suicides
Warning !!!
This part of the walkthrough contains some screenshots with graphical violent content.
There are many ways to die in Stasis, as it has the old-school approach to dangerous situations that Sierra games used to have. In addition to normal game deaths, there are certain ways to commit suicide as a brutal form of easter egg.
The following tables show ways to die in Stasis. These can unlock some achievements for those players who use Steam. Note that this isn't a complete guide to Steam achievements. Spoiler Free Achievement Guide made by Dave B should cover most or all Steam achievements.
| Normal game deaths | |
 Acid death. Acid death. |
Drill the acid tank in the maintenance room without using the valves to release the pressure. |
 Furnace death. Furnace death. |
At the morgue, jam the furnace door and stay in the room longer than few seconds which you have to escape. |
 Mutant death. Mutant death. |
Try to cross the cloning vat without causing an electric shock first. |
 Gas death. Gas death. |
Open the tram station B door without venting the atmosphere. |
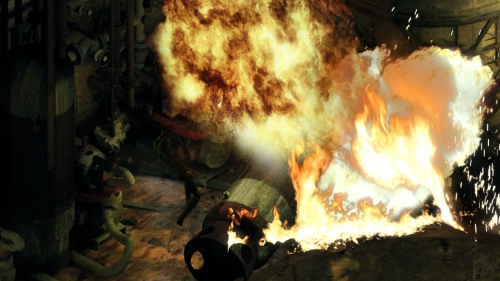 Explosion death. Explosion death. |
Ignite the methane tank in the sewers while standing next to it. |
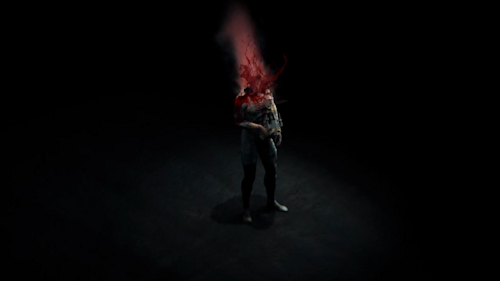
 Turret death. Turret death. |
In the Medical wing walk in front of the turrets before they are deactived. |
 Surgery death. Surgery death. |
Make a mistake during the spinal cord surgery either by pushing a wrong button or being too slow. |
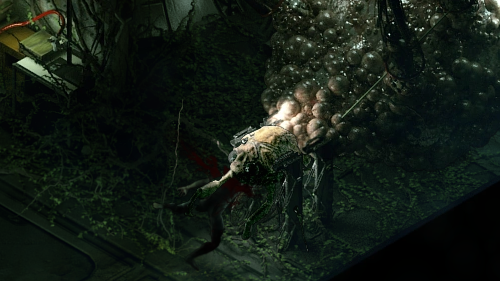 Queen insect death. Queen insect death. |
Interact with the queen insect not being cautious. |
 Insect swarm death. Insect swarm death. |
In the hydroponics, try to cross the room without killing the insect swarm first. |
 Robot death. Robot death. |
In the laboratory area walk in front of the patrolling robot. |
 Electric shock death. Electric shock death. |
Outside janitorial office, use prosthetic arm with the breaker box without insulating it. |
 Antagonist death. Antagonist death. |
During the final confrontation with Dr Malan, try to shoot him or stay inactive, in both cases Dr Malan will shoot you. |
| Suicides | |
| All suicides work in the same way. You need to pick up an object and use it twice on yourself without doing other actions in between. Not all inventory items work for suicides, and even the ones that do may need a special environment. It is easy to recognise which objects have this ability. When using any item on yourself, you will hear some kind of "that won't work" comment. The items that can be used for suicide give no reaction on the first time, and the second time will be a special cutscene showing a brutal easter egg. | |
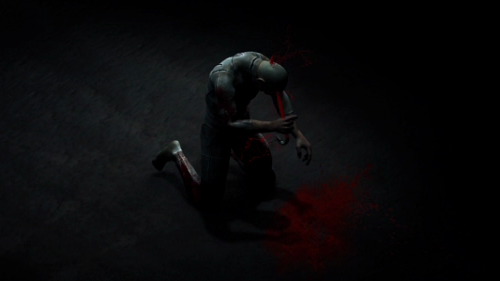
 Drill suicide Drill suicide |
Use the high speed neural drill on yourself. |
 Glass shard suicide. Glass shard suicide. |
Use a shard of glass on yourself. |
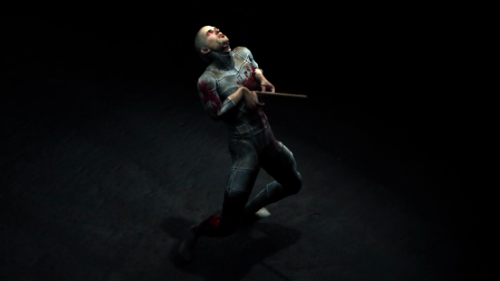
 Crowbar suicide. Crowbar suicide. |
Use the crowbar on yourself. |
 Pool cue suicide. Pool cue suicide. |
Use the pool cue on yourself. |
 Cigarette lighter suicide. Cigarette lighter suicide. |
Use Cayne Corporation lighter on yourself. |
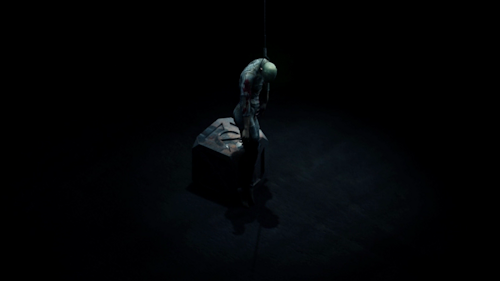 Hanging suicide. Hanging suicide. |
Use loose cables on yourself. |
 Slug gun suicide. Slug gun suicide. |
Use high temperature slug gun on yourself while standing on a power pad. (This can only be done in the laboratory area.) |
 Acid suicide. Acid suicide. |
Use the hazmat glove filled with acid on yourself. (This can only be done in the room with the acid stream, as that's where you find the glove and if you use the acid on the metal grating to proceed further, you can't refill the glove with acid.) |
 Plasma cutter suicide. Plasma cutter suicide. |
Use the plasma cutter on yourself while standing on a power pad. (This can only be done in the janitorial office.) |