The Curse of Life walkthrough
About this walkthrough
This is a complete walkthrough for The Curse of Life.
Using this walkthrough will get you through the game with the least amount of time and wandering around, but may spoil the game and fun of exploring.
Items which can be picked up as inventory items and items which can be constructed by combining or using other items are written with bold text for emphasis.
Note: the action verbs and texts on the screen don't match in the English version of the game. Here's how they basically are:
Pick up = Take
Talk to = Speak to
Look at = Examine
Use = Use
This walkthrough uses forms which are displayed on the screen, in other words not the words in the action verbs.
- Speak to Jasmine about everything.
- Use screen.
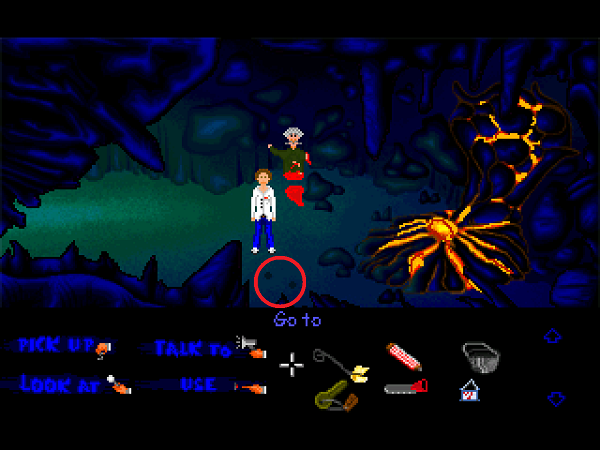
- Take microphone to get microphone. It is located right behind the plant, getting it requires some pixel hunting.
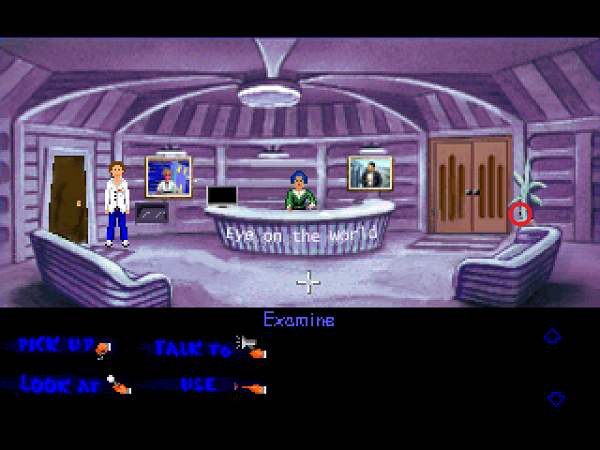 Location of microphone circled.
- Use microphone with conditioner.
- Watch the cutscene.
- Speak to the head about everything.
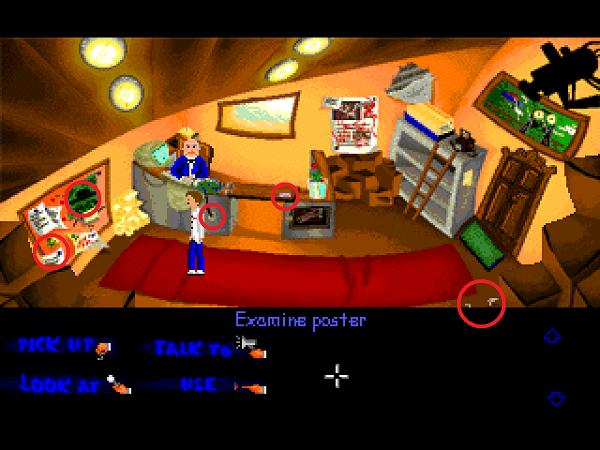
- Examine poster on the bulletin board.
- Examine scroll on the bulletin board.
- Speak to the head about I.U.M.
- Examine credit card, try to take it.
- There is a plug connected to electic outlet that powers head's computer. Use plug to divert his attention for a moment, use electric outlet to do it again. Both of these will do the same, the only difference is whether head's computer screen goes black or lights up again.
- Try to take credit card when head's attention is on the computer.
- Take string to get string. It is located next to the red carpet, partially blocked by the inventory, getting it requires some pixel hunting.
 Hotspots in the room.
- Use door to exit.
- Take adhesive tape to get adhesive tape. It is on the secretary's table.
- Use door on the left to exit.
- On the street, notice Bank'O'Matic on the wall. Try to use it.
- Examine sign above the door.
- Use door to enter.
- Talk to rude librarian about everything.
- Use door to exit.
- Walk right and examine dispenser.
- Walk right and examine sign above the door.
- Use the interphone to talk with the police about everything, especially report a theft to get temporary driving license.
- Examine drain at the street corner.
- Use string with adhesive tape to get gimmick.
- Use gimmick with the coin in the drain to get coin.
- Use coin with dispenser to get newspaper.
- Go back to the library.
- Use newspaper with rude librarian to get pencil.
- Exit and return to head's office.
- Use plug or electric outlet to divert head's attention, and when he is looking at his monitor, use temporary driving license with credit card to get credit card.
- There is a small paper attached to the bookshelf next to the door. Take small paper to get membership-card.
- Go back to Bank'O'Matic.
- Use credit card with Bank'O'Matic. You don't know the exact code, so exit the screen.
- Go back to the library.
- Talk to rude librarian about borrowing a book about Mayas to get 'Maya'. Now the rude librarian knows about your membership-card and you can borrow almost any book you want.
- Use pencil with 'Maya'.
- Try to speak to nerd.
- Use 'Maya' with school books.
- Speak to nerd to make him drop his notes.
- Take notes to get notes.
- Check which books the library has, seeing some of them can require some pixel hunting. You can borrow most of them, but only one at a time. Simply click "Pick up" and then the book you want to get it, or some reason why you can't get it.
- Take 'How to discover passwords' and then examine the book.
- Take 'Beyond' and then examine the book.
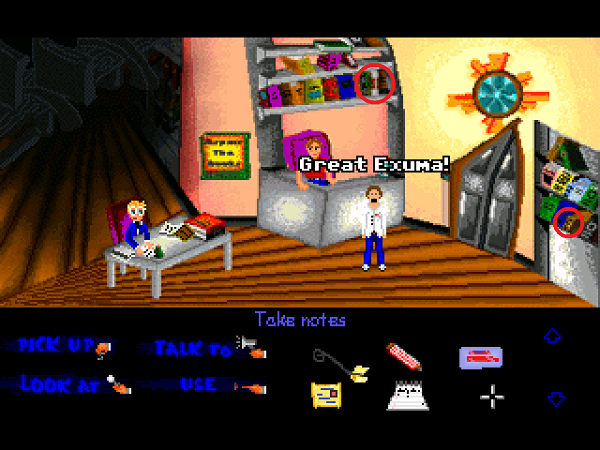 Locations of the needed books.
- Exit and return to head's office.
- Talk to the head about I.U.M., Roswell and UFO sightings.
- Go back to the street.
- Use credit card with Bank'O'Matic.
- Based on what the head told you, enter the correct code.
- If you can't figure it out, it's the year of the Kecksburg UFO incident, 1965. Somehow the Bank'O'Matic gives you a wallet.
- Walk right to the bus.
- Use bus to travel to Great Exuma and Proxy Studios. Note that some inventory items will disappear during the travel.
- Speak to the cop about everything.
- Walk right to exit the studio entrance.
- You will see a map of the island, with several locations on it. These have not been translated in the English version. While they are easy enough to understand, here are the locations and translations:
Studi = Studio
Spiaggia = Beach
Caverna = Cavern
Casetta = Cabin
Santuario = Sanctuary
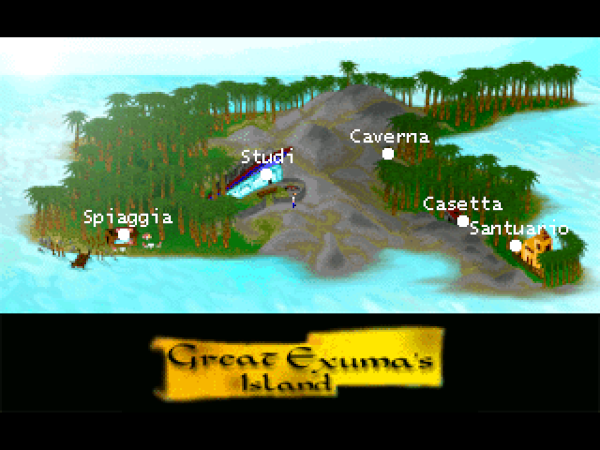 Great Exuma map.
- First, go to the beach.
- Speak to the director about everything.
- Take bucket to get bucket and gum.
- Speak to Frank about everything to get keys.
- Walk left to get back to the map.
- Go to the sanctuary.
- Watch the cutscene and go through the conversation with Randal.
- Speak to the saint about everything.
- Take stick to get stick that is lying on the ground next to the statue.
- Walk right to get back to the map.
- Go to the cabin.
- Take saw to get saw from the ground.
- Use stick with coconuts to get coconut.
- Try to use door.
- Use keys with door to unlock the door and enter the cabin.
- Use coconut with parrot to get it drop a feather.
- Take feather to get feather, seeing it can require some pixel hunting over the orange background on the floor.
- Examine safe.
- Go right to exit the cabin, and right again to get back to the map.
- Go to the cavern.
- Examine carved diagram. After that, you can examine three cavities below carvings for some hints.
- Walk left to get back to the map.
- Go to the beach.
- Use feather with the director to get pass.
- Go back to the map and back to the studio.
- Use pass with the cop to enter the studio.
- Speak to the general about everything.
- Take the general to get general.
- Walk left and speak to the 'hens'.
- Examine mannequin.
- Walk right a little bit and use dressing room's door to enter that room.
- Speak to Fioona about everything.
- Take poster from the table in the back to get poster.
- Use poster with wig-fixer to get glued poster.
- Examine diamond.
- Go to exit (it's a small hotspot between the black and green areas of the screen).
- Use glued poster with mannequit to create Daniel's mannequin.
- Speak to the 'hens'.
- Use saw with floor tiles in front of the mannequin to create cut tiles.
- Speak to the 'hens'.
- Use dressing room's door to enter the other room.
- Speak to Daniel Monroe about everything.
- Take drawer to get dynamite.
- Right next to the open drawer is a coat hanger with a jacket. The jacket has a pocket that may require a little bit of pixel hunting to find. Take pocket to get ticket. Note that this can only be done when Monroe's attention is elsewhere, which is when he is saying "To be or not to be, this is the question..." to his imaginary audience.
- Examine ticket.
- Go to exit (it's a small hotspot between the black and green areas of the screen).
- Go back to Fioona's dressing room.
- Go to exit, walk right and use door to exit the studio (illogically clicking go to exit here won't work), and go back to the map.
- Go to the cavern.
- Use gum with cavity to get flabby mould. Note that this only works with the skull shaped cavity.
- Go to the cabin.
- Use flabby mould with rock to get hardened mould.
- Use door to enter cabin.
- Use dynamite with safe.
- Use general with hole and watch a short cutscene.
- Take cigar to get cigar.
- Go back to the map and back to the cavern.
- Use diamond with cavity that resembles a triangle.
- Use hardened mould with cavity that is a skull shaped cavity.
- Use cigar with cavity that is six-seven centimeters long.
- Watch the cutscene that follows.
- Speak to Randal about everything. Speaking to Randal starts a conversation puzzle, where to goal is to find the right choices to have Randal do or give something for you.
- If you can't figure it out, the correct choices are as follow:
"I hate when people hits me in the back."
"There was no need to hit me."
"Randal, do I have to remind you that I've been elected journalist of the week?"
"You know nothing about it. Probably, the youngest person you know is already dead."
"I suppose he hates you."
"Being a dentist is more rewarding than being a 'strange and perverted Mayan legends enthusiast' journalist..."
"I'm not sure I'm willing to help you."
End the conversation to get medal in the inventory.
- There are two holes in the ground straight down from Randal. Examine hole to learn more about it.
 Location of the holes.
- Use medal with hole (the right one).
- Use pencil with hole (the left one).
- Watch the cutscene that follows.
- Talk to Hazmis about everything.
- Use bucket with sea bank to get bucket with water.
- Use bucket with water with Hazmis.
- Watch the cutscene and credits.
 The game is finished!
THE GAME IS FINISHED. CONGRATULATIONS!!!